Appearance
异步&事件环
一.Promise.race原理
1.实现原理
Promise.race = function(promises) {
    return new Promise((resolve, reject) => {
        for (let i = 0; i < promises.length; i++) {
            let currentVal = promises[i];
            if (currentVal && typeof currentVal.then == 'function') {
                currentVal.then(resolve, reject);
            } else {
                resolve(currentVal);
            }
        }
    })
}
1
2
3
4
5
6
7
8
9
10
11
12
2
3
4
5
6
7
8
9
10
11
12
race只采用第一个成功或者失败的结果
2.应用场景 (超时处理)
let p = new Promise((resolve, reject) => {
    setTimeout(() => {
        resolve('成功');
    }, 3000);
})
function wrap(p){
    let abort;
    let p1 = new Promise((resolve,reject)=>{
        abort = reject;
    });
    let newPromise = Promise.race([p1,p])
    newPromise.abort = abort
    return newPromise
}
let p1 = wrap(p);
p1.then(data => {
    console.log('success', data)
}, err => {
    console.log('error', err)
})
setTimeout(() => {
    p1.abort('超过2s了');
}, 2000);
1
2
3
4
5
6
7
8
9
10
11
12
13
14
15
16
17
18
19
20
21
22
23
24
2
3
4
5
6
7
8
9
10
11
12
13
14
15
16
17
18
19
20
21
22
23
24
借助race的特点,可以实现立即中断promise变为失败态。常用作超时操作
作业:
Promise.allSettled: 拿到所有promise的返回结果Promise.any: 获取第一个成功的值,都失败才失败
二.promisify原理
function promisify(fn){
    return function (...args) {
        return new Promise((resolve,reject)=>{
            fn(...args,function (err,data) {
                if(err) reject();
                resolve(data);
            })
        });
    }
}
let read = promisify(fs.readFile);
1
2
3
4
5
6
7
8
9
10
11
2
3
4
5
6
7
8
9
10
11
三.generator使用
1.遍历器的基本实现
const interable = { 0: 'a', 1: 'b', 2: 'c', length: 3 };
interable[Symbol.iterator] = function() {
    let index = 0;
    return { // 遍历器对象
        next: () => {
            return { value: this[index], done: index++ == this.length }
        }
    }
}
1
2
3
4
5
6
7
8
9
2
3
4
5
6
7
8
9
如果我们自己去迭代一个对象需要实现一个迭代器接口,自己返回一个具有next方法的对象。内部会调用这个next方法返回结果包含value和done,当done为true时迭代完成
2.通过生成器实现
const iterable = { 0: 'a', 1: 'b', 2: 'c', length: 3 };
iterable[Symbol.iterator] = function*() {
    let index = 0;
    while (index !== this.length) {
        yield this[index++]
    }
}
console.log([...iterable]);
1
2
3
4
5
6
7
8
2
3
4
5
6
7
8
3. 生成器使用
function co(it){
    return new Promise((resolve,reject)=>{
        function next(data){
            let {value,done} = it.next(data);
            if(!done){
                Promise.resolve(value).then(data=>{
                    next(data);
                },reject)
            }else{
                resolve(value);
            }
        }
        next();
    });
}
1
2
3
4
5
6
7
8
9
10
11
12
13
14
15
2
3
4
5
6
7
8
9
10
11
12
13
14
15
这里我们主是掌握思想,异步迭代的思想。(产生一个迭代函数,当做回调函数使用)
四. 浏览器事件环
1.浏览器的进程
- 每一个页卡都是进程 (互不影响)
- 浏览器也有一个主进程 (用户界面)
- 渲染进程 每个页卡里 都有一个渲染进程 (浏览器内核)
- 网络进程 (处理请求)
GPU进程3d绘制- 第三方插件的进程
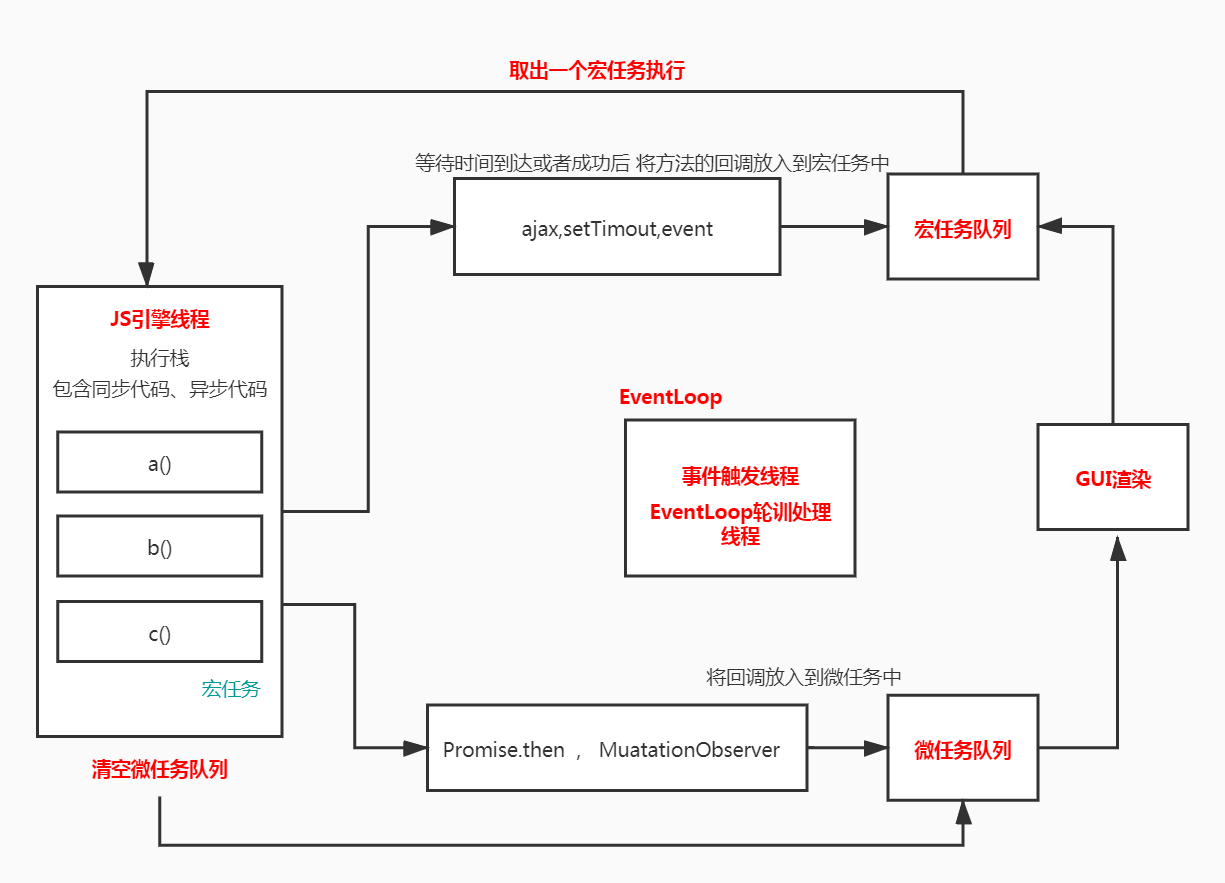
#2. 渲染进程(包含着多个线程)
- GUI渲染线程 (渲染页面的)
js引擎线程 他和页面渲染时互斥- 事件触发线程 独立的线程
EventLoop - 事件
click、setTimeout、ajax也是一个独立线程
微任务队列每次都会创建一个全新的队列、事件队列仅有一个

- 事件队列、消息队列:存放定时器到达时间的回调函数、
ajax回调成功的函数等 - 事件循环:不断检测调用栈是否为空,如果为空则从事件对列中取出一个来执行
3.宏任务,微任务
- 宏任务
scriptui渲染、setTimeout、setInterval、postMessage、MessageChannel、SetImmediate - 微任务
promisemutationObserver、process.nextTick
每循环一次会执行一个宏任务,并清空对应的微任务队列,每次事件循环完毕后会判断页面是否需要重新渲染 (大约
16.6ms会渲染一次)
4.微任务和GUI渲染
<script>
        document.body.style.background = 'red';
        console.log(1)
        Promise.resolve().then(()=>{
            console.log(2)
            document.body.style.background = 'yellow';
        })
        console.log(3);
</script>
1
2
3
4
5
6
7
8
9
2
3
4
5
6
7
8
9
5.事件任务
<script>
        button.addEventListener('click',()=>{
            console.log('listener1');
            Promise.resolve().then(()=>console.log('micro task1'))
        })
        button.addEventListener('click',()=>{
            console.log('listener2');
            Promise.resolve().then(()=>console.log('micro task2'))
        })
        button.click(); // click1() click2()
</script>
1
2
3
4
5
6
7
8
9
10
11
2
3
4
5
6
7
8
9
10
11
6.定时器任务
<script>
        Promise.resolve().then(() => {
            console.log('Promise1')
            setTimeout(() => {
                console.log('setTimeout2')
            }, 0);
        })
        setTimeout(() => {
            console.log('setTimeout1');
            Promise.resolve().then(() => {
                console.log('Promise2')
            })
        }, 0);
</script>
1
2
3
4
5
6
7
8
9
10
11
12
13
14
2
3
4
5
6
7
8
9
10
11
12
13
14
7.任务执行面试题
console.log(1);
async function async () {
    console.log(2);
    await console.log(3);
    console.log(4)
}
setTimeout(() => {
	console.log(5);
}, 0);
const promise = new Promise((resolve, reject) => {
    console.log(6);
    resolve(7)
})
promise.then(res => {
	console.log(res)
})
async ();
console.log(8);
1
2
3
4
5
6
7
8
9
10
11
12
13
14
15
16
17
18
2
3
4
5
6
7
8
9
10
11
12
13
14
15
16
17
18
掌握Vue中
nextTick原理