Appearance
微前端 -(实战篇)
最近你有没有经常听到一个词?那就是微前端! 感觉听上去非常的高大上!然而~
微前端其实非常的简单,容易落地,而且也不高大上~
一.为什么需要微前端?
我们通过3W(what,why,how)的方式来讲解微前端
What?什么是微前端?

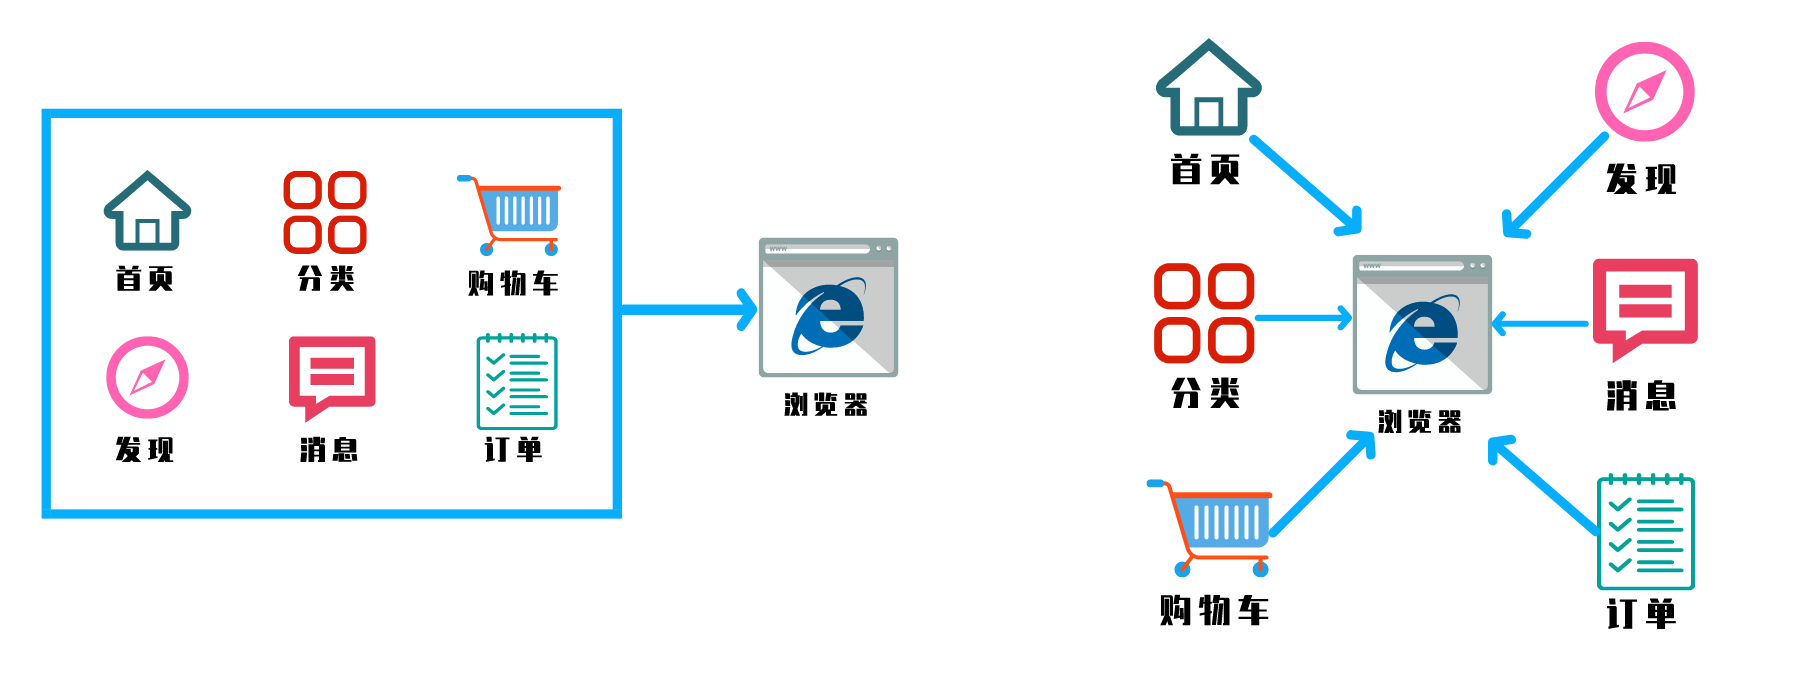
微前端就是将不同的功能按照不同的维度拆分成多个子应用。通过主应用来加载这些子应用。
微前端的核心在于拆, 拆完后在合!
Why?为什么去使用他?
- 不同团队间开发同一个应用技术栈不同怎么破?
- 希望每个团队都可以独立开发,独立部署怎么破?
- 项目中还需要老的应用代码怎么破?
我们是不是可以将一个应用划分成若干个子应用,将子应用打包成一个个的lib。当路径切换时加载不同的子应用。这样每个子应用都是独立的,技术栈也不用做限制了!从而解决了前端协同开发问题
How?怎样落地微前端?

2018年 Single-SPA诞生了, single-spa是一个用于前端微服务化的JavaScript前端解决方案 (本身没有处理样式隔离,js执行隔离) 实现了路由劫持和应用加载
2019年 qiankun基于Single-SPA, 提供了更加开箱即用的 API (single-spa + sandbox + import-html-entry) 做到了,技术栈无关、并且接入简单(像iframe一样简单)
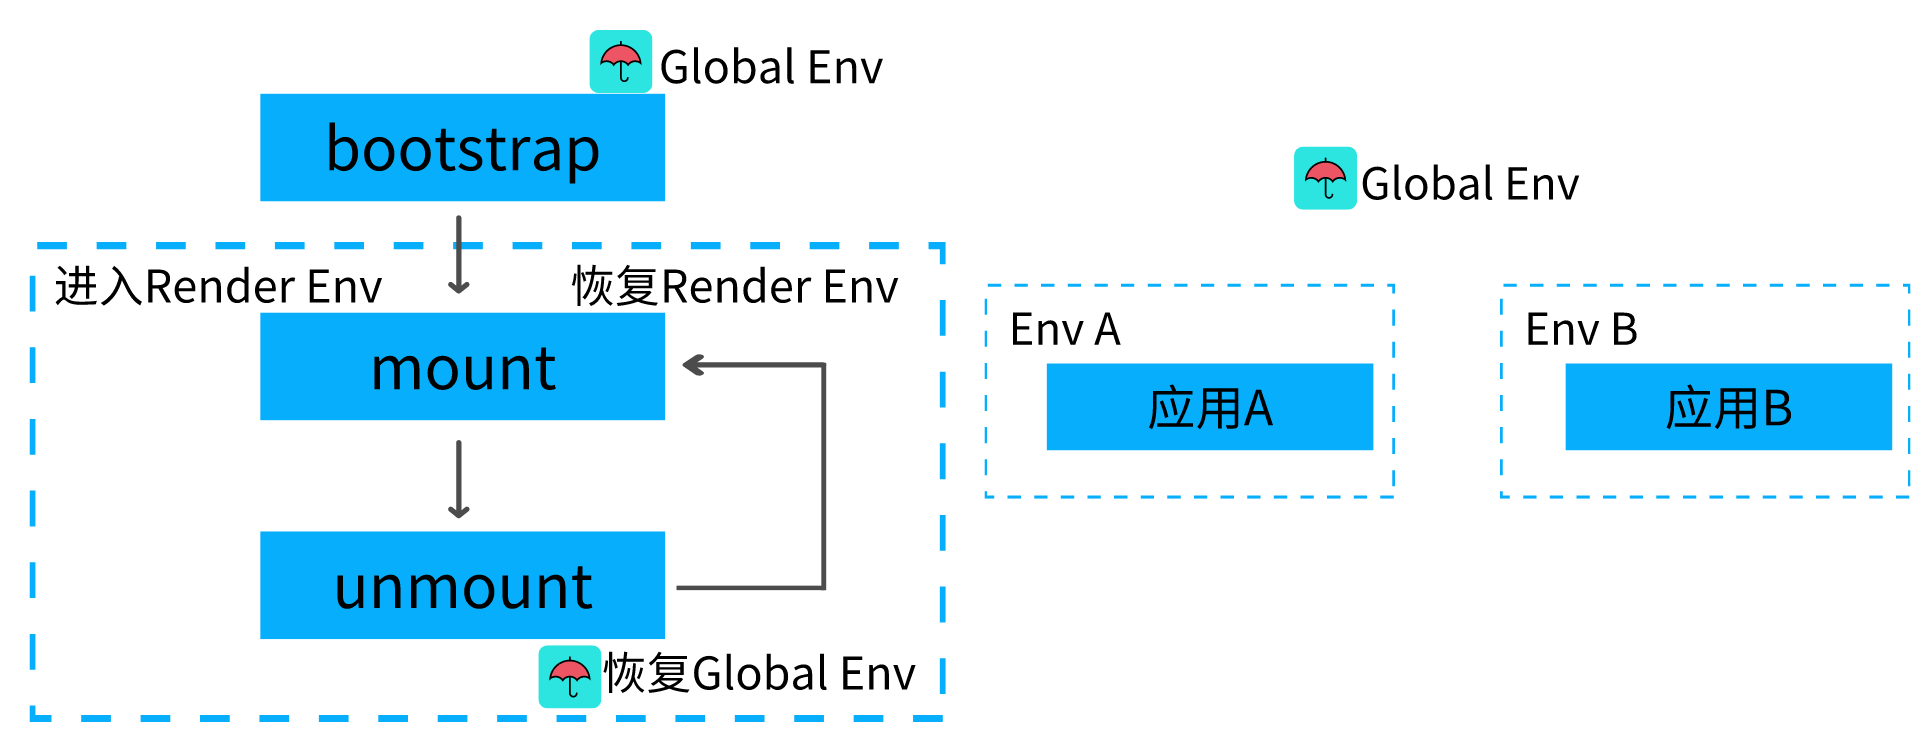
总结:子应用可以独立构建,运行时动态加载,主子应用完全解耦,技术栈无关,靠的是协议接入(子应用必须导出 bootstrap、mount、unmount方法)
这里先回答大家肯定会问的问题:
这不是iframe吗?
- 如果使用
iframe,iframe中的子应用切换路由时用户刷新页面就尴尬了。
应用通信:
基于URL来进行数据传递,但是传递消息能力弱
基于
CustomEvent实现通信基于props主子应用间通信
使用全局变量、
Redux进行通信
公共依赖:
CDN- externalswebpack联邦模块
二 .SingleSpa实战
1).构建子应用
vue create spa-vue
npm install single-spa-vue
1
2
2
import singleSpaVue from 'single-spa-vue';
const appOptions = {
   el: '#vue',
   router,
   render: h => h(App)
}
// 在非子应用中正常挂载应用
if(!window.singleSpaNavigate){
 delete appOptions.el;
 new Vue(appOptions).$mount('#app');
}
const vueLifeCycle = singleSpaVue({
   Vue,
   appOptions
});
// 子应用必须导出 以下生命周期 bootstrap、mount、unmount
export const bootstrap = vueLifeCycle.bootstrap;
export const mount = vueLifeCycle.mount;
export const unmount = vueLifeCycle.unmount;
export default vueLifeCycle;
1
2
3
4
5
6
7
8
9
10
11
12
13
14
15
16
17
18
19
20
2
3
4
5
6
7
8
9
10
11
12
13
14
15
16
17
18
19
20
const router = new VueRouter({
  mode: 'history',
  base: '/vue',
  routes
})
1
2
3
4
5
2
3
4
5
配置子路由基础路径
2).配置库打包
module.exports = {
    configureWebpack: {
        output: {
            library: 'singleVue',
            libraryTarget: 'umd'
        },
        devServer:{
            port:10000
        }
    }
}
1
2
3
4
5
6
7
8
9
10
11
2
3
4
5
6
7
8
9
10
11
将子模块打包成类库
3).主应用搭建
<div id="nav">
    <router-link to="/vue">vue项目</router-link>
    <div id="vue"></div>
</div>
1
2
3
4
2
3
4
将子应用挂载到
id="vue"标签中
import Vue from 'vue'
import App from './App.vue'
import router from './router'
import ElementUI from 'element-ui';
import 'element-ui/lib/theme-chalk/index.css';
Vue.use(ElementUI);
const loadScript = async (url)=> {
  await new Promise((resolve,reject)=>{
    const script = document.createElement('script');
    script.src = url;
    script.onload = resolve;
    script.onerror = reject;
    document.head.appendChild(script)
  });
}
import { registerApplication, start } from 'single-spa';
registerApplication(
    'singleVue',
    async ()=>{
        await loadScript('http://localhost:10000/js/chunk-vendors.js');
        await loadScript('http://localhost:10000/js/app.js');
        return window.singleVue
    },
    location => location.pathname.startsWith('/vue')
)
start();
new Vue({
  router,
  render: h => h(App)
}).$mount('#app')
1
2
3
4
5
6
7
8
9
10
11
12
13
14
15
16
17
18
19
20
21
22
23
24
25
26
27
28
29
30
31
2
3
4
5
6
7
8
9
10
11
12
13
14
15
16
17
18
19
20
21
22
23
24
25
26
27
28
29
30
31
4).动态设置子应用publicPath
if(window.singleSpaNavigate){
  __webpack_public_path__ = 'http://localhost:10000/'
}
1
2
3
2
3
三.qiankun实战
1).主应用编写
<el-menu :router="true" mode="horizontal">
    <el-menu-item index="/">首页</el-menu-item>
    <el-menu-item index="/vue">vue应用</el-menu-item>
    <el-menu-item index="/react">react应用</el-menu-item>
</el-menu>
<router-view v-show="$route.name"></router-view>
<div v-show="!$route.name" id="vue"></div>
<div v-show="!$route.name" id="react"></div>
1
2
3
4
5
6
7
8
2
3
4
5
6
7
8
2).注册子应用
import {registerMicroApps,start} from 'qiankun'
const apps = [
  {
    name:'vueApp',
    entry:'//localhost:10000',
    container:'#vue',
    activeRule:'/vue'
  },
  {
    name:'reactApp',
    entry:'//localhost:20000',
    container:'#react',
    activeRule:'/react'
  }
]
registerMicroApps(apps);
start();
1
2
3
4
5
6
7
8
9
10
11
12
13
14
15
16
17
2
3
4
5
6
7
8
9
10
11
12
13
14
15
16
17
3).子Vue应用
let instance = null;
function render(){
  instance = new Vue({
    router,
    render: h => h(App)
  }).$mount('#app')
}
if(window.__POWERED_BY_QIANKUN__){
  __webpack_public_path__ = window.__INJECTED_PUBLIC_PATH_BY_QIANKUN__;
}
if(!window.__POWERED_BY_QIANKUN__){render()}
export async function bootstrap(){}
export async function mount(props){render();}
export async function unmount(){instance.$destroy();}
1
2
3
4
5
6
7
8
9
10
11
12
13
14
2
3
4
5
6
7
8
9
10
11
12
13
14
打包配置
module.exports = {
    devServer:{
        port:10000,
        headers:{
            'Access-Control-Allow-Origin':'*'
        }
    },
    configureWebpack:{
        output:{
            library:'vueApp',
            libraryTarget:'umd'
        }
    }
}
1
2
3
4
5
6
7
8
9
10
11
12
13
14
2
3
4
5
6
7
8
9
10
11
12
13
14
4).子React应用
import React from 'react';
import ReactDOM from 'react-dom';
import './index.css';
import App from './App';
function render() {
  ReactDOM.render(
    <React.StrictMode>
      <App />
    </React.StrictMode>,
    document.getElementById('root')
  );
}
if(!window.__POWERED_BY_QIANKUN__){
  render()
}
export async function bootstrap() {}
export async function mount() {render();}
export async function unmount() {
  ReactDOM.unmountComponentAtNode(document.getElementById("root"));
}
1
2
3
4
5
6
7
8
9
10
11
12
13
14
15
16
17
18
19
20
21
2
3
4
5
6
7
8
9
10
11
12
13
14
15
16
17
18
19
20
21
重写react中的webpack配置文件 (config-overrides.js)
yarn add react-app-rewired --save-dev
1
module.exports = {
  webpack: (config) => {
    config.output.library = `reactApp`;
    config.output.libraryTarget = "umd";
    config.output.publicPath = 'http://localhost:20000/'
    return config
  },
  devServer: function (configFunction) {
    return function (proxy, allowedHost) {
      const config = configFunction(proxy, allowedHost);
      config.headers = {
        "Access-Control-Allow-Origin": "*",
      };
      return config;
    };
  },
};
1
2
3
4
5
6
7
8
9
10
11
12
13
14
15
16
17
2
3
4
5
6
7
8
9
10
11
12
13
14
15
16
17
配置.env文件
PORT=20000
WDS_SOCKET_PORT=20000
1
2
2
React路由配置
import { BrowserRouter, Route, Link } from "react-router-dom"
const BASE_NAME = window.__POWERED_BY_QIANKUN__ ? "/react" : "";
function App() {
  return (
    <BrowserRouter basename={BASE_NAME}>
      <Link to="/">首页</Link>
      <Link to="/about">关于</Link>
      <Route path="/" exact render={() => <h1>hello home</h1>}></Route>
      <Route path="/about" render={() => <h1>hello about</h1>}></Route>
    </BrowserRouter>
  );
}
1
2
3
4
5
6
7
8
9
10
11
12
2
3
4
5
6
7
8
9
10
11
12
四.CSS隔离方案
子应用之间样式隔离:
Dynamic Stylesheet动态样式表,当应用切换时移除老应用样式,添加新应用样式
主应用和子应用之间的样式隔离:
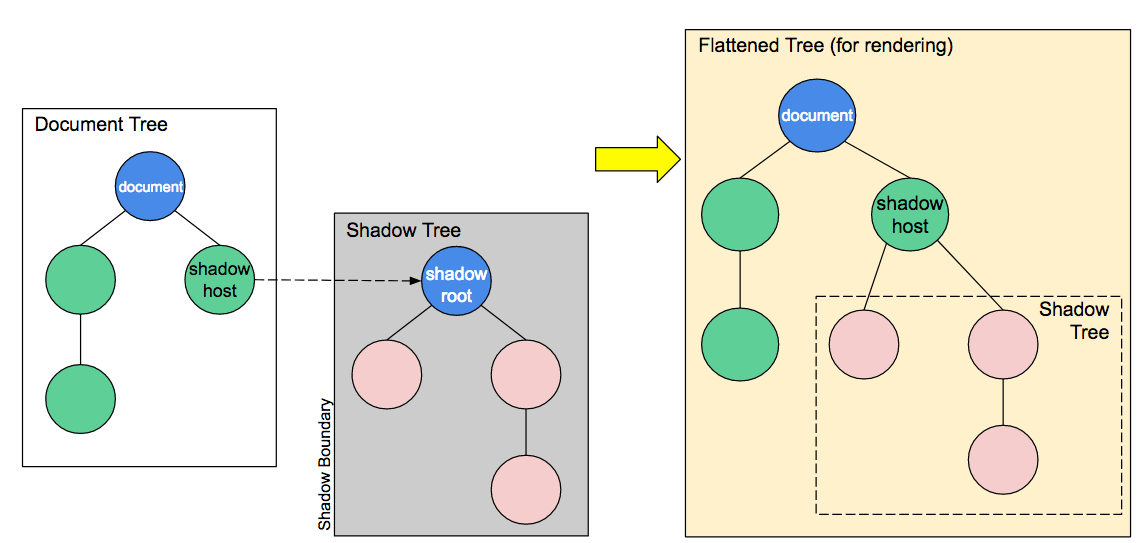
BEM(Block Element Modifier) 约定项目前缀CSS-Modules打包时生成不冲突的选择器名Shadow DOM真正意义上的隔离css-in-js

let shadowDom = shadow.attachShadow({ mode: 'open' });
let pElement = document.createElement('p');
pElement.innerHTML = 'hello world';
let styleElement = document.createElement('style');
styleElement.textContent = `
    p{color:red}
`
shadowDom.appendChild(pElement);
shadowDom.appendChild(styleElement)
1
2
3
4
5
6
7
8
9
2
3
4
5
6
7
8
9
shadow DOM 可以实现真正的隔离机制
五.JS沙箱机制

当运行子应用时应该跑在内部沙箱环境中
- 快照沙箱,在应用沙箱挂载或卸载时记录快照,在切换时依据快照恢复环境 (无法支持多实例)
- Proxy 代理沙箱,不影响全局环境
1).快照沙箱
1.激活时将当前window属性进行快照处理
2.失活时用快照中的内容和当前window属性比对
3.如果属性发生变化保存到
modifyPropsMap中,并用快照还原window属性4.在次激活时,再次进行快照,并用上次修改的结果还原window
class SnapshotSandbox {
    constructor() {
        this.proxy = window;
        this.modifyPropsMap = {}; // 修改了那些属性
        this.active();
    }
    active() {
        this.windowSnapshot = {}; // window对象的快照
        for (const prop in window) {
            if (window.hasOwnProperty(prop)) {
                // 将window上的属性进行拍照
                this.windowSnapshot[prop] = window[prop];
            }
        }
        Object.keys(this.modifyPropsMap).forEach(p => {
            window[p] = this.modifyPropsMap[p];
        });
    }
    inactive() {
        for (const prop in window) { // diff 差异
            if (window.hasOwnProperty(prop)) {
                // 将上次拍照的结果和本次window属性做对比
                if (window[prop] !== this.windowSnapshot[prop]) {
                    // 保存修改后的结果
                    this.modifyPropsMap[prop] = window[prop];
                    // 还原window
                    window[prop] = this.windowSnapshot[prop];
                }
            }
        }
    }
}
1
2
3
4
5
6
7
8
9
10
11
12
13
14
15
16
17
18
19
20
21
22
23
24
25
26
27
28
29
30
31
32
2
3
4
5
6
7
8
9
10
11
12
13
14
15
16
17
18
19
20
21
22
23
24
25
26
27
28
29
30
31
32
let sandbox = new SnapshotSandbox();
((window) => {
    window.a = 1;
    window.b = 2;
    window.c = 3
    console.log(a,b,c)
    sandbox.inactive();
    console.log(a,b,c)
})(sandbox.proxy);
1
2
3
4
5
6
7
8
9
2
3
4
5
6
7
8
9
快照沙箱只能针对单实例应用场景,如果是多个实例同时挂载的情况则无法解决,只能通过proxy代理沙箱来实现
2).Proxy 代理沙箱
class ProxySandbox {
    constructor() {
        const rawWindow = window;
        const fakeWindow = {}
        const proxy = new Proxy(fakeWindow, {
            set(target, p, value) {
                target[p] = value;
                return true
            },
            get(target, p) {
                return target[p] || rawWindow[p];
            }
        });
        this.proxy = proxy
    }
}
let sandbox1 = new ProxySandbox();
let sandbox2 = new ProxySandbox();
window.a = 1;
((window) => {
    window.a = 'hello';
    console.log(window.a)
})(sandbox1.proxy);
((window) => {
    window.a = 'world';
    console.log(window.a)
})(sandbox2.proxy);
1
2
3
4
5
6
7
8
9
10
11
12
13
14
15
16
17
18
19
20
21
22
23
24
25
26
27
2
3
4
5
6
7
8
9
10
11
12
13
14
15
16
17
18
19
20
21
22
23
24
25
26
27
每个应用都创建一个proxy来代理window,好处是每个应用都是相对独立,不需要直接更改全局window属性!