1.同步和异步 #
- JavaScript 中的同步(Synchronous)和异步(Asynchronous)是编程模式,用于处理代码执行的顺序和时间
1.1 同步 #
- 同步编程是一种执行顺序,代码按照预定顺序逐行执行。在同步执行中,一段代码在执行完成之前,后面的代码必须等待
- 这种执行顺序很容易理解,但可能会导致性能问题,尤其是在执行耗时操作(如网络请求、文件读写等)时
console.log('1');
console.log('2');
console.log('3');
1.2 异步 #
- 异步编程允许在执行耗时操作时,不阻塞代码执行。异步操作通常在后台进行,允许主线程继续执行其他任务
- 异步编程特别适用于处理网络请求、文件读写、定时任务等耗时操作,因为它们可能需要一段时间才能完成,而在此期间,我们不希望阻塞其他代码的执行
1.2.1 setTimeout #
console.log('1');
setTimeout(() => {
  console.log('2');
}, 1000);
console.log('3');
1.2.2 Ajax #
<body>
    <script>
        console.log(1);
        var xhr = new XMLHttpRequest();
        xhr.onreadystatechange = function () {
            if (this.readyState === 4 && this.status === 200) {
                console.log('responseText', this.responseText);
            }
        };
        xhr.open("GET", "data.txt", false);
        xhr.send();
        console.log(2);
    </script>
</body>
2.事件绑定 #
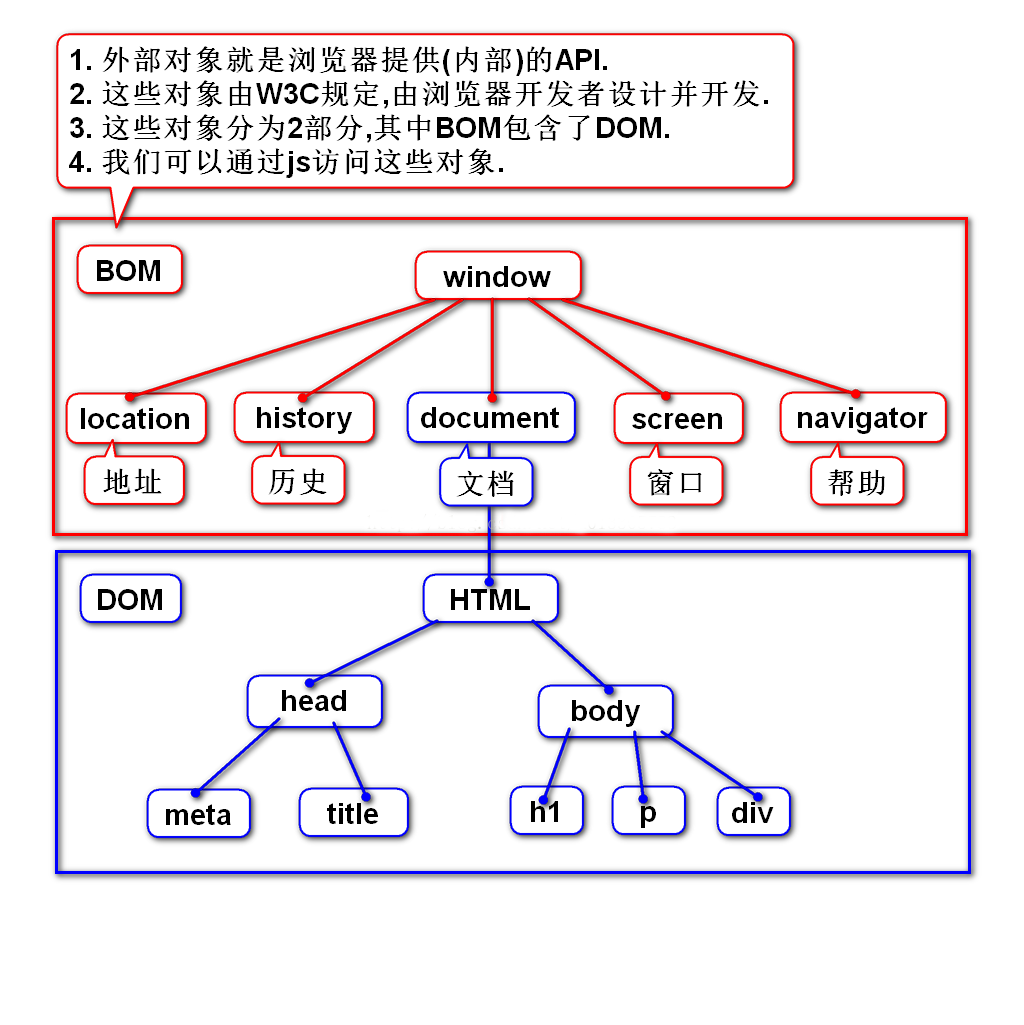
- DOM(文档对象模型,Document Object Model)是一种表示和操作HTML和XML文档结构的编程接口
- DOM事件是在DOM中定义的事件模型,用于处理HTML和XML文档中的事件
- DOM事件分为DOM0级事件和DOM2级事件
2.1 DOM0级事件 #
- DOM0级事件是早期的事件处理模型,它允许在HTML元素上直接添加事件处理函数
- DOM0级事件的缺点是无法为同一事件添加多个处理函数。当为一个事件添加新的处理函数时,先前的处理函数会被覆盖
- 另外DOM0级事件处理函数在执行时会将this值设置为触发事件的元素,这可能导致作用域问题
- DOM0级事件可以通过两种方式绑定
2.1.1 内联模型 #
- 在HTML元素中直接添加事件处理函数
<body>
    <button onclick="alert('Hello, World!')">Click me!</button>
</body>
2.1.2 脚本模型 #
- 在JavaScript代码中为HTML元素添加事件处理函数。例如:
<body>
    <button onclick="alert('Hello')">Click me!</button>
    <script>
        const button = document.querySelector("button");
        button.onclick = function () {
            console.log(this,"World");
        };
    </script>
</body>
2.2 DOM2级事件 #
- DOM2级事件是W3C在DOM Level 2规范中定义的事件模型
- DOM1级规范(DOM Level 1)并没有涉及到事件模型
- 相比于DOM0级事件,DOM2级事件提供了更强大的事件处理能力。DOM2级事件的主要特点如下:
- 支持事件捕获和事件冒泡
- 事件捕获是从根元素向目标元素逐级查找事件处理函数的过程
- 事件冒泡是从目标元素向根元素逐级触发事件处理函数的过程
- DOM2级事件允许你选择使用事件捕获或事件冒泡。
- 事件捕获是从根元素向目标元素逐级查找事件处理函数的过程
- 支持为同一事件添加多个处理函数,这使得你可以为同一事件执行多个操作,而不会互相覆盖。
- 支持事件捕获和事件冒泡
- 在使用
addEventListener方法时,可以选择传递一个布尔值来表示是否在捕获阶段处理事件。默认情况下,该值为false,表示事件处理函数在冒泡阶段执行 - DOM2级事件模型相比于DOM0级事件模型,具有更多的优势和灵活性。现代Web开发中,通常会使用DOM2级事件处理模型
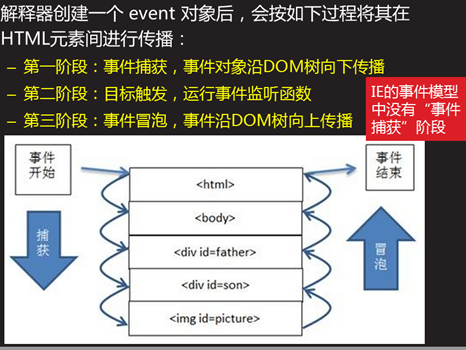
2.3 事件生命周期 #
- 浏览器事件的生命周期主要分为三个阶段:捕获阶段、目标阶段和冒泡阶段。这些阶段共同构成了事件流
- 在处理事件时,事件对象event包含有关事件的详细信息
- 例如,
event.target表示触发事件的目标元素 event.type表示事件的类型(如"click")event.currentTarget表示当前处理事件的元素
- 例如,
- 浏览器事件的生命周期包括捕获阶段、目标阶段和冒泡阶段。这三个阶段共同构成了事件流,使得事件可以在DOM树中传播并触发相应的事件处理程序
<body>
    <div id="parent">
        <div id="child">
            click
        </div>
    </div>
    <script>
        const parent = document.querySelector("#parent");
        const child = document.querySelector("#child");
        function captureClick(event) {
            //event.stopPropagation();
            console.log('captureClick', 'target=', event.target.id, 'currentTarget=', event.currentTarget.id);
        }
        function bubbleClick(event) {
            if(event.stopPropagation){
                event.stopPropagation();
            }else{
                event.cancelBubble = true;
            }
            //event.stopPropagation();
            //event.stopImmediatePropagation();
            console.log('bubbleClick', 'target=', event.target.id, 'currentTarget=', event.currentTarget.id);
        }
        function bubbleClick2(event) {
            console.log('bubbleClick2')
        }
        parent.addEventListener("click", captureClick, true);
        child.addEventListener("click", captureClick, true);
        parent.addEventListener("click", bubbleClick, false);
        child.addEventListener("click", bubbleClick, false);
        child.addEventListener("click", bubbleClick2, false);
    </script>
</body>
2.3.1 捕获阶段(Capturing Phase) #
- 事件捕获阶段是事件生命周期的第一个阶段
- 在此阶段,事件从根元素(如document或window对象)开始,沿着DOM树向目标元素传播
- 在这个过程中,浏览器检查每个祖先元素是否有捕获阶段的事件监听器,如果有,浏览器会触发这些监听器
- 需要注意的是,捕获阶段的事件监听器不是很常见,因为大多数事件处理程序都是在冒泡阶段执行。要在捕获阶段添加事件监听器,可以将addEventListener方法的第三个参数设置为true
addEventListener是一个DOM方法,用于在指定元素上绑定事件处理程序。通过使用addEventListener,你可以为元素的某个事件添加一个或多个处理程序,而不会覆盖已存在的处理程序。这使得事件处理更加灵活,同时也支持了事件捕获和冒泡- eventType(字符串):要监听的事件类型,例如:"click"、"mousedown"、"mousemove"等
- eventHandler(函数):当指定事件类型触发时要执行的回调函数。该回调函数接收一个event参数,包含有关事件的详细信息
- useCapture(布尔值,可选):是否在捕获阶段处理事件。如果为true,则事件处理程序在捕获阶段执行;如果为false或省略此参数,则事件处理程序在冒泡阶段执行。默认值为false
event的target属性指向触发事件的原始目标元素。换句话说,target是实际上引发事件的元素。在事件生命周期中,target属性在捕获阶段、目标阶段和冒泡阶段保持不变。因此,你可以使用event.target来确定实际发生交互的元素,无论事件处理程序是在哪个阶段执行的event的currentTarget属性指向当前处理事件的元素。换句话说,currentTarget是事件处理程序所附加的元素。与target属性不同,currentTarget属性在事件生命周期的不同阶段可能指向不同的元素,因为事件处理程序可以在不同的元素上执行
element.addEventListener(eventType, eventHandler, useCapture);
- 与DOM0级事件处理模型相比,addEventListener具有以下优点:
- 可以为同一个元素的同一个事件添加多个处理程序,而不会相互覆盖
- 支持事件捕获和冒泡
- 允许通过调用removeEventListener方法来移除事件处理程序
- 要移除已添加的事件处理程序,可以使用
removeEventListener方法
2.3.2 目标阶段(Target Phase) #
- 目标阶段是事件生命周期的第二个阶段。在此阶段,事件到达实际触发事件的目标元素
- 在目标阶段,浏览器会触发目标元素上的事件处理程序,无论它们是在捕获阶段还是冒泡阶段添加的
2.3.3 冒泡阶段(Bubbling Phase) #
- 冒泡阶段是事件生命周期的第三个阶段
- 在此阶段,事件从目标元素开始,沿着DOM树向根元素传播。在这个过程中,浏览器检查每个祖先元素是否有冒泡阶段的事件监听器。如果有,浏览器会触发这些监听器
- 大多数事件处理程序都是在冒泡阶段执行。要在冒泡阶段添加事件监听器,可以将addEventListener方法的第三个参数设置为false或省略
- 需要注意的是,并非所有事件都支持冒泡。例如,focus和blur事件只在捕获阶段触发
- 在事件的生命周期中,你可以使用event.stopPropagation()方法阻止事件进一步传播。这意味着事件将不会继续在捕获阶段或冒泡阶段传播。你还可以使用event.stopImmediatePropagation()方法阻止事件的传播并阻止在当前元素上的其他事件监听器被触发。这意味着同一个元素上的其他同类型事件处理程序将不会执行
event.stopPropagation()方法用于阻止事件在DOM树中进一步传播。当调用event.stopPropagation()时,事件将不再向上(冒泡阶段)或向下(捕获阶段)传播,但仍会触发当前元素上的其他同类型事件监听器。换句话说,event.stopPropagation()只会阻止事件在当前元素的祖先或子孙元素上的事件监听器被触发event.stopImmediatePropagation()方法不仅阻止事件在DOM树中的传播,还阻止当前元素上的其他同类型事件监听器被触发。当调用event.stopImmediatePropagation()时,当前元素上的其他同类型事件处理程序将不会执行
3.事件类型 #
3.1 window vs document #
- window对象表示浏览器窗口,它是JavaScript中的全局对象。window对象包含了浏览器的许多功能,例如定时器(如setTimeout和setInterval)、浏览器操作(如alert、confirm和prompt)等。此外,window对象还提供了许多预定义的对象和方法,如navigator(用于获取浏览器信息)、location(用于获取或修改当前URL)等
- document对象是表示当前网页的HTML文档的对象。它是window对象的一个属性,用于操作和修改网页的内容、结构和样式。document对象提供了一系列方法和属性,使得开发者能够使用JavaScript对网页元素进行增、删、改、查等操作。例如,你可以使用getElementById、querySelector等方法来选择网页上的元素,使用createElement、appendChild等方法来创建和添加元素,以及使用classList、style等属性来修改元素的样式。
- 总结:window对象表示浏览器窗口,是JavaScript的全局对象,提供了许多预定义的对象和方法。document对象表示当前网页的HTML文档,是window对象的一个属性,用于操作和修改网页的内容、结构和样式
3.2 鼠标事件 #
| 事件名 | 介绍 | 是否可冒泡 |
|---|---|---|
| mousedown | 当按下鼠标按钮时触发该事件 | 是 |
| mouseup | 当释放鼠标按钮时触发该事件 | 是 |
| click | 当鼠标单击元素时触发该事件(mousedown 和 mouseup 事件顺序发生在同一元素上 |
是 |
| dblclick | 当鼠标在元素上双击时触发该事件 | 是 |
| mouseover | 当鼠标指针移动到元素上时触发该事件 | 是 |
| mousemove | 当鼠标在元素上移动时触发该事件 | 是 |
| mouseout | 当鼠标指针移出元素时触发该事件 | 是 |
| mouseenter | 当鼠标指针进入元素时触发该事件(不冒泡) | 否 |
| mouseleave | 当鼠标指针离开元素时触发该事件(不冒泡) | 否 |
| contextmenu | 当在元素上单击鼠标右键(或在 Mac 上按 control + 点击)时触发该事件,通常用于显示自定义上下文菜单 | 是 |
3.2.1 mousedown #
mousedown事件是一个鼠标事件,当用户在浏览器中按下鼠标按钮时触发。这个事件可以在任何可见的 HTML 元素上发生,包括文本、图像、按钮等- 当用户按下鼠标按钮时,浏览器会创建一个 MouseEvent 对象,其中包含有关该事件的详细信息,如事件类型、目标元素、鼠标位置等。然后,该事件会沿着 DOM 树向上冒泡,直到它到达根节点或被取消
<body>
    <button id="button">按钮</button>
    <script>
        const button = document.getElementById("button");
        button.addEventListener("mousedown", function (event) {
            console.log("mousedown");
        });
    </script>
</body>
3.2.2 mouseup #
- mouseup 事件是一个在用户释放鼠标按键时触发的事件。当用户按下鼠标按钮然后释放时,浏览器会触发这个事件。mouseup 事件通常与 mousedown 和 mousemove 事件一起使用,以处理鼠标相关的交互
- mouseup 事件可以冒泡,这意味着如果在一个元素上触发了该事件,它会逐级向上传递,直到到达根元素。如果需要阻止事件冒泡,可以在事件处理函数中使用 event.stopPropagation() 方法
<body>
    <button id="button">按钮</button>
    <script>
        const button = document.getElementById("button");
        button.addEventListener("mousedown", function (event) {
            console.log("mousedown");
        });
        button.addEventListener("mouseup", function (event) {
            console.log("mouseup");
        });
    </script>
</body>
3.2.3 click #
click事件是一个在用户点击元素时触发的浏览器事件。当用户在元素上按下并释放鼠标按钮(通常是左键)时,浏览器会触发这个事件click事件常用于处理元素的点击操作,如按钮点击、链接跳转等- click 事件是由一系列其他事件组成的,包括 mousedown、mouseup 和(如果鼠标移动距离不大的话)mousemove
- click 事件也可以冒泡,这意味着如果在一个元素上触发了该事件,它会逐级向上传递,直到到达根元素。如果需要阻止事件冒泡,可以在事件处理函数中使用 event.stopPropagation() 方法
- 如果需要阻止元素的默认点击行为(例如,阻止链接的跳转),可以在事件处理函数中使用 event.preventDefault() 方法
<body>
    <button id="button">按钮</button>
    <script>
        const button = document.getElementById("button");
        button.addEventListener("mousedown", function (event) {
            console.log("mousedown");
        });
        button.addEventListener("mouseup", function (event) {
            console.log("mouseup");
        });
        button.addEventListener("click", function (event) {
            console.log("click");
        });
    </script>
</body>
3.2.4 dblclick #
- dblclick 事件是一个在用户双击元素时触发的浏览器事件。当用户在元素上连续迅速地单击鼠标两次(通常是左键)时,浏览器会触发这个事件。dblclick 事件常用于处理元素的双击操作,例如放大图片、编辑文本等
<body>
    <button id="button">按钮</button>
    <script>
        const button = document.getElementById("button");
        button.addEventListener("mousedown", function (event) {
            console.log("mousedown");
        });
        button.addEventListener("mouseup", function (event) {
            console.log("mouseup");
        });
        button.addEventListener("click", function (event) {
            console.log("click");
        });
    </script>
</body>
3.2.5 mouseover #
- mouseover 事件是一个在用户将鼠标指针移动到元素上时触发的浏览器事件
- 当鼠标指针进入元素的边界时,浏览器会触发这个事件
- mouseover 事件常用于处理与鼠标悬停相关的交互,例如显示工具提示、弹出菜单或改变元素样式等

<head>
    <style>
        #container {
            width: 100px;
            height: 100px;
            background-color: lightgreen;
        }
    </style>
</head>

<body>
    <div id="container"></div>
    <script>
        const container = document.getElementById("container");
        container.addEventListener("mouseover", function (event) {
            console.log("mouseover");
        });
    </script>
</body>
3.2.6 mousemove #
- mousemove 事件是一个在用户在元素上移动鼠标时触发的浏览器事件
- 当鼠标指针在元素的边界内移动时,浏览器会持续触发这个事件
- mousemove 事件常用于处理与鼠标移动相关的交互,例如跟踪鼠标位置、实现拖放功能或自定义光标样式等
<head>
    <style>
        #container {
            width: 100px;
            height: 100px;
            background-color: lightgreen;
        }
    </style>
</head>

<body>
    <div id="container"></div>
    <script>
        const container = document.getElementById("container");
        container.addEventListener("mouseover", function (event) {
            console.log("mouseover");
        });
        container.addEventListener("mousemove", function (event) {
            console.log("mousemove");
        });
    </script>
</body>
3.2.6 mouseout #
- mouseout 事件是一个在用户将鼠标指针移出元素时触发的浏览器事件
- 当鼠标指针离开元素的边界时,浏览器会触发这个事件
- mouseout 事件常用于处理与鼠标离开元素相关的交互,例如隐藏工具提示、弹出菜单或还原元素样式等
<head>
    <style>
        #container {
            width: 100px;
            height: 100px;
            background-color: lightgreen;
        }
    </style>
</head>

<body>
    <div id="container"></div>
    <script>
        const container = document.getElementById("container");
        container.addEventListener("mouseover", function (event) {
            console.log("mouseover");
        });
        container.addEventListener("mousemove", function (event) {
            console.log("mousemove");
        });
        container.addEventListener("mouseout", function (event) {
            console.log("mouseout");
        });
    </script>
</body>
3.2.7 mouseenter #
- mouseenter 事件是一个在用户将鼠标指针移动到元素上时触发的浏览器事件
- 当鼠标指针进入元素的边界时,浏览器会触发这个事件
- mouseenter 事件常用于处理与鼠标悬停相关的交互,例如显示工具提示、弹出菜单或改变元素样式等
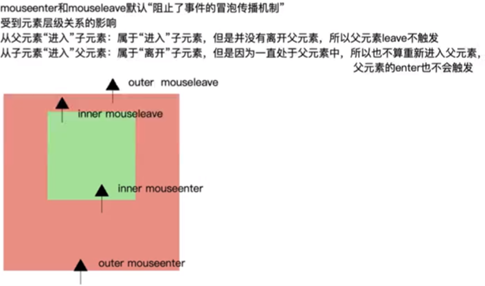
- 与 mouseover 事件类似,mouseenter 事件也用于检测鼠标指针进入元素的情况。但是,mouseenter 事件不会冒泡,这意味着当在一个元素上触发该事件时,它不会逐级向上传递至根元素。这使得 mouseenter 事件在某些情况下更适合处理鼠标悬停相关的交互
<head>
    <style>
        #container {
            width: 100px;
            height: 100px;
            background-color: lightgreen;
        }
    </style>
</head>

<body>
    <div id="container"></div>
    <script>
        const container = document.getElementById("container");
        container.addEventListener("mouseover", function (event) {
            console.log("mouseover");
        });
        container.addEventListener("mousemove", function (event) {
            console.log("mousemove");
        });
        container.addEventListener("mouseout", function (event) {
            console.log("mouseout");
        });
        container.addEventListener("mouseenter", function (event) {
            console.log("mouseenter");
        });
    </script>
</body>
3.2.8 mouseleave #
- mouseleave 事件是一个在用户将鼠标指针移出元素时触发的浏览器事件
- 当鼠标指针离开元素的边界时,浏览器会触发这个事件
- mouseleave 事件常用于处理与鼠标离开元素相关的交互,例如隐藏工具提示、弹出菜单或还原元素样式等
- 与 mouseout 事件类似,mouseleave 事件也用于检测鼠标指针离开元素的情况。但是,mouseleave 事件不会冒泡,这意味着当在一个元素上触发该事件时,它不会逐级向上传递至根元素
<head>
    <style>
        #container {
            width: 100px;
            height: 100px;
            background-color: lightgreen;
        }
    </style>
</head>

<body>
    <div id="container"></div>
    <script>
        const container = document.getElementById("container");
        container.addEventListener("mouseover", function (event) {
            console.log("mouseover");
        });
        container.addEventListener("mousemove", function (event) {
            console.log("mousemove");
        });
        container.addEventListener("mouseout", function (event) {
            console.log("mouseout");
        });
        container.addEventListener("mouseenter", function (event) {
            console.log("mouseenter");
        });
        container.addEventListener("mouseleave", function (event) {
            console.log("mouseleave");
        });
    </script>
</body>
mouseover
mouseenter
mousemove
mouseout
mouseleave
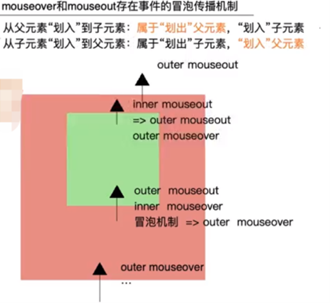
3.2.9 比较 #
- mouseover和mouseout冒泡,从内向外触发,先执行
- mouseenter和mouseleave不冒泡,从外向内触发,后执行
head>
    <style>
        #parent {
            width: 200px;
            height: 200px;
            background-color: lightgreen;
        }

        #child {
            width: 100px;
            height: 100px;
            background-color: lightpink;
        }
    </style>
</head>

<body>
    <div id="parent">
        <div id="child"></div>
    </div>
    <script>
        const parent = document.getElementById("parent");
        parent.addEventListener("mouseover", function (event) {
            console.log("parent mouseover");
        });
        parent.addEventListener("mousemove", function (event) {
            //console.log("parent mousemove");
        });
        parent.addEventListener("mouseout", function (event) {
            console.log("parent mouseout");
        });
        parent.addEventListener("mouseenter", function (event) {
            console.log("parent mouseenter");
        });
        parent.addEventListener("mouseleave", function (event) {
            console.log("parent mouseleave");
        });
        const child = document.getElementById("child");
        child.addEventListener("mouseover", function (event) {
            console.log("child mouseover");
        });
        child.addEventListener("mousemove", function (event) {
            //console.log("child mousemove");
        });
        child.addEventListener("mouseout", function (event) {
            console.log("child mouseout");
        });
        child.addEventListener("mouseenter", function (event) {
            console.log("child mouseenter");
        });
        child.addEventListener("mouseleave", function (event) {
            console.log("child mouseleave");
        });
    </script>
</body>
parent mouseover
                parent mouseenter
parent mouseout
child mouseover
parent mouseover
               child mouseenter
child mouseout
parent mouseout
               child mouseleave
parent mouseover
parent mouseout
              parent mouseleave
3.2.10 contextmenu #
- contextmenu 事件是一个在浏览器中触发右键菜单的事件
- 当用户在元素上点击鼠标右键时,这个事件就会被触发
- 这个事件可以用来自定义浏览器的默认右键菜单,或者在特定元素上提供特殊的右键菜单操作
<body>
    <div id="customElement">右键点击</div>
    <script>
        const customElement = document.getElementById("customElement");
        customElement.addEventListener("contextmenu", function (event) {
            console.log('contextmenu');
        });
    </script>
</body>
3.3 键盘事件 #
- 浏览器的键盘事件用于处理用户与键盘交互时发生的事件
- 可以为实现了 EventTarget 接口的对象绑定键盘事件
- window 对象:将键盘事件绑定到整个窗口。当用户在浏览器窗口内按下键盘上的键时,将触发事件。这种方法适用于处理全局快捷键或游戏控制等场景
- document 对象:将键盘事件绑定到整个文档。与 window 对象类似,当用户在页面内按下键盘上的键时,将触发事件
- HTML 元素:将键盘事件绑定到具体的 HTML 元素,如输入框、按钮、文本域等。此类对象通常使用 tabindex 属性来设置焦点顺序。当用户在特定元素上操作键盘时,才会触发事件
// 绑定到 window 对象
window.addEventListener('keydown', function(event) {
  // 处理键盘事件
});
// 绑定到 document 对象
document.addEventListener('keydown', function(event) {
  // 处理键盘事件
});
// 绑定到具体的 HTML 元素
const inputElement = document.getElementById('my-input');
inputElement.addEventListener('keydown', function(event) {
  // 处理键盘事件
});
3.3.1 keydown #
keydown:当用户按下一个键时触发keydown事件在用户按下键盘上的任意键时触发,包括字符键(字母、数字、标点符号等)和非字符键(如功能键、方向键等)。当你需要捕获用户与键盘的所有交互时,可以使用keydown事件- 使用场景示例:
- 自定义快捷键组合,例如 Ctrl + S 或者 Ctrl + Shift + N
- 捕获方向键,例如在游戏或者可交互地图中控制角色或地图移动
- 监听特殊键的按下状态,例如在绘图应用中,按住 Shift 键进行等比例缩放
document.addEventListener('keydown', function(event) {
  if (event.ctrlKey && event.key === 's') {
    event.preventDefault(); // 阻止浏览器默认行为
    console.log('执行自定义保存操作');
  }
});
3.3.2 keypress #
keypress:当用户按下并松开一个字符键(如字母、数字或标点符号键)时触发。注意,非字符键(例如功能键、方向键)不会触发此事件- keypress 事件仅在用户按下并松开字符键时触发,非字符键不会触发此事件。当你关注的是用户输入的字符内容时,可以使用 keypress 事件
- 使用场景示例:
- 在输入框中限制用户输入特定字符,例如只允许输入数字
- 实现自动补全功能,例如在输入框中根据用户输入的字符提供建议
- 根据用户输入的字符进行实时搜索或过滤
- keypress 事件在一些现代浏览器中已被废弃,因此在实际开发中,你可能需要根据 keydown 事件的 event.key 或 event.code 属性来判断具体的字符输入
- isFinite 是 JavaScript 中的一个全局函数,用于检查传入的参数是否是有限数值。换句话说,它可以帮助我们判断一个值是否为非无穷大的数字
<body>
    <input type="text" id="phone" placeholder="请输入电话号码" />
    <script>
        const phoneInput = document.getElementById('phone');
        phoneInput.addEventListener('keypress', function (event) {
            const key = event.key;
            // 如果按下的不是数字,则阻止输入
            if (!isFinite(key)) {
                event.preventDefault();
                return;
            }
            // 获取当前输入框中的值
            const currentValue = phoneInput.value;
            // 根据电话号码格式,添加分隔符
            if (currentValue.length === 3) {
                phoneInput.value += '-';
            }
        });
    </script>
</body>
3.3.3 keyup #
keyup:当用户松开一个键时触发- 场景示例
- 检测按键的持续时间:在一些应用场景中,可能需要检测用户按住某个键的持续时间,例如游戏中的角色控制。此时可以使用 keydown 事件来记录按下时间,然后使用 keyup 事件来记录松开时间,从而计算按键持续时间
- 限制连续触发事件:在某些情况下,需要避免用户按住键不放导致连续触发事件。例如,在输入框中,为了避免频繁触发实时搜索或过滤,可以在用户松开键时执行相关操作
let startTime;
document.addEventListener('keydown', function(event) {
  if (event.key === 'a') {
    startTime = new Date().getTime();
  }
});
document.addEventListener('keyup', function(event) {
  if (event.key === 'a') {
    let endTime = new Date().getTime();
    let duration = endTime - startTime;
    console.log('按键持续时间:', duration, '毫秒');
  }
});
const inputBox = document.querySelector('#inputBox');
inputBox.addEventListener('keyup', function(event) {
  let searchText = inputBox.value;
  console.log('执行实时搜索,关键词:', searchText);
});
3.4 表单事件 #
| 事件名 | 介绍 | 是否可冒泡 |
|---|---|---|
| input | 当元素的值发生变化时触发该事件 | 是 |
| change | 当元素的值发生变化时触发该事件 | 是 |
| focus | 当元素获得焦点时触发该事件 | 否 |
| blur | 当元素失去焦点时触发该事件 | 否 |
| submit | 当提交表单时触发该事件 | 是 |
| reset | 当重置表单时触发该事件 | 是 |
| select | 当用户选中输入框中的文本时触发该事件 | 是 |
3.4.1 input #
- input 事件是一个在表单元素中非常有用的事件
- 当表单元素的值发生变化时,input 事件就会触发。它可以应用在多种表单元素上,如 input、select 和 textarea
- 通常,我们使用 input 事件来实时获取用户输入的数据,以便在用户输入时执行一些实时操作,例如数据验证、搜索建议等
<body>
    <input />
    <script>
        var input = document.querySelector('input');
        input.addEventListener('input', function (event) {
            console.log('input');
        });
    </script>
</body>
3.4.2 change #
- change 事件是一个在表单元素中触发的事件,当表单元素的值发生变化并且元素失去焦点时,change 事件就会触发
- 它可以应用在多种表单元素上,如 input、select 和 textarea
- 通常,我们使用 change 事件在用户完成输入后执行一些操作,例如数据验证、表单提交等
<body>
    <input />
    <script>
        var input = document.querySelector('input');
        input.addEventListener('input', function (event) {
            console.log('input');
        });
        input.addEventListener('change', function (event) {
            console.log('change');
        });
    </script>
</body>
3.4.3 focus #
- focus 事件是一个在浏览器中触发的事件,当表单元素或其他可聚焦元素获得焦点时,focus 事件就会触发
- 它可以应用在多种元素上,如 input、select、textarea 以及具有 tabindex 属性的元素
- 通常,我们使用 focus 事件来自定义用户聚焦元素时的样式,或在元素获得焦点时执行一些操作,例如显示提示信息、高亮选中文本等
- 需要注意的是,focus 事件不会冒泡。如果需要在祖先元素上监听 focus 事件,可以使用 focusin 事件,它的行为类似于 focus 事件,但可以冒泡
<body>
    <input />
    <script>
        var input = document.querySelector('input');
        input.addEventListener('input', function (event) {
            console.log('input');
        });
        input.addEventListener('change', function (event) {
            console.log('change');
        });
        input.addEventListener('focus', function (event) {
            console.log('focus');
        });
    </script>
</body>
3.4.4 blur #
- blur 事件是一个在浏览器中触发的事件,当表单元素或其他可聚焦元素失去焦点时,blur 事件就会触发
- 它可以应用在多种元素上,如 input、select、textarea 以及具有 tabindex 属性的元素
- 通常,我们使用 blur 事件在元素失去焦点时执行一些操作,例如数据验证、隐藏提示信息等
<body>
    <input />
    <script>
        var input = document.querySelector('input');
        input.addEventListener('input', function (event) {
            console.log('input');
        });
        input.addEventListener('change', function (event) {
            console.log('change');
        });
        input.addEventListener('focus', function (event) {
            console.log('focus');
        });
        input.addEventListener('blur', function (event) {
            console.log('blur');
        });
    </script>
</body>
3.4.5 submit #
- HTML表单的 submit 事件会在用户提交表单时被触发
- 常见的触发方式是用户点击提交按钮,或者在最后一个表单字段中按下 Enter 键
- submit 事件是一个可取消的事件。这意味着,你可以通过调用事件对象的 preventDefault 方法来阻止表单的默认提交行为。这在你想使用JavaScript来处理表单数据,如通过AJAX进行表单提交时,是非常有用的
<body>
     <form>
        <label for="name">Name:</label><br>
        <input type="text" id="name" name="name"><br>
        <input type="submit" value="Submit">
    </form>
    <script>
        // 获取表单元素
        const form = document.querySelector('form');
        // 添加 submit 事件监听器
        form.addEventListener('submit', function(event) {
        // 阻止表单的默认提交行为
        event.preventDefault();
        // 这里可以添加你自己的表单处理代码
        console.log('Form submitted!');
        });
    </script>
</body>
3.5 系统事件 #
| 事件名 | 介绍 | 是否可冒泡 |
|---|---|---|
| scroll | 当元素或窗口滚动时触发 | 是 |
| load | 当页面加载完成时触发 | 否 |
| resize | 当窗口或框架被重新调整大小时触发 | 否 |
| DOMContentLoaded | 当HTML文档被完全加载和解析时触发 | 是 |
| unload | 当页面完全卸载时触发 | 否 |
| beforeunload | 当窗口或标签页关闭前触发 | 否 |
| abort | 当加载资源过程被用户终止时触发 | 是 |
| error | 当加载资源发生错误时触发 | 是 |
| online | 当设备重新连接到互联网时触发 | 是 |
| offline | 当设备失去互联网连接时触发 | 是 |
3.5.1 scroll #
- scroll 事件是一个浏览器中的系统事件,当元素或窗口发生滚动时触发
- 这个事件可以用来检测页面或元素的滚动位置,然后执行相应的操作,例如懒加载图片、显示/隐藏导航栏或者实现无限滚动等
- scroll 事件可以在全局 window 对象或者具有滚动条的元素上触发。当用户滚动页面或者滚动元素时,浏览器会触发该事件
<body>
    <div id="scrollable-element" style="height:500px;overflow: auto;">
        <div style="height: 1000px; background-color: lightgreen;"></div>
    </div>
    <script>
        window.addEventListener('scroll', function (event) {
            console.log('页面滚动了');
        });
        const scrollableElement = document.querySelector('#scrollable-element');
        scrollableElement.addEventListener('scroll', function (event) {
            console.log('元素滚动了');
        });
    </script>
</body>
3.5.2 resize #
- resize 事件是一个浏览器中的系统事件,它在窗口或框架大小被调整时触发
- 此事件可以用来在浏览器窗口大小发生变化时执行特定操作,例如重新计算布局、调整元素尺寸或更新图表等
- 需要注意的是,resize 事件仅在 window 对象上触发,而不是在普通的 DOM 元素上触发
<body>
    <script>
        window.addEventListener('resize', function (event) {
            console.log('窗口大小发生了变化');
        });
    </script>
</body>
3.5.3 load #
- load 事件是一个浏览器中的系统事件,它在文档或资源(如图片、脚本等)完成加载时触发
- 对于整个页面来说,当页面中的所有资源(包括外部脚本、样式表、图片等)都加载完毕时,浏览器会在 window 对象上触发 load 事件
- 对于单个资源,当资源加载完成时,浏览器会在对应的 DOM 元素(如 img、script、link 等)上触发 load 事件
- load 事件可以用来确保页面中的所有资源都已加载完成,然后执行特定操作,例如初始化脚本、启动应用程序等。同时,可以用它来检测单个资源的加载状态,以便在资源加载完成后执行操作,如显示图片或执行脚本等。
<body>
    <img src="https://www.baidu.com/img/PCtm_d9c8750bed0b3c7d089fa7d55720d6cf.png" />
    <script>
        window.addEventListener('load', function (event) {
            console.log('页面加载完成');
        });
        const imageElement = document.querySelector('img');
        imageElement?.addEventListener('load', function (event) {
            console.log('图片加载完成');
        });
        const scriptElement = document.createElement('script');
        scriptElement.src = 'script.js';
        scriptElement.addEventListener('load', function (event) {
            console.log('脚本加载完成');
        });
        document.head.appendChild(scriptElement);
    </script>
</body>
3.5.4 DOMContentLoaded #
- DOMContentLoaded 事件是一个浏览器中的系统事件,它在 HTML 文档被完全加载和解析时触发,但在此时可能尚未加载完所有外部资源(如图片、样式表等)
- 这个事件通常用于在页面结构解析完成后立即执行操作,如初始化脚本、添加事件监听器或操作 DOM
- 与 load 事件不同,DOMContentLoaded 事件在页面的外部资源(如图片和样式表)尚未加载完成时就会触发。因此,如果你的代码仅依赖于 DOM 结构,而不依赖于外部资源,可以使用 DOMContentLoaded 事件来加速代码执行。然而,如果你的代码依赖于外部资源,例如需要操作已加载的图片,那么应该使用 load 事件
<body>
    <img src="https://www.baidu.com/img/PCtm_d9c8750bed0b3c7d089fa7d55720d6cf.png" />
    <script>
        window.addEventListener('load', function (event) {
            console.log('页面加载完成');
        });
        const imageElement = document.querySelector('img');
        imageElement?.addEventListener('load', function (event) {
            console.log('图片加载完成');
        });
        const scriptElement = document.createElement('script');
        scriptElement.src = 'script.js';
        scriptElement.addEventListener('load', function (event) {
            console.log('脚本加载完成');
        });
        document.head.appendChild(scriptElement);
        document.addEventListener('DOMContentLoaded', function (event) {
            console.log('HTML 文档已加载和解析');
        });
    </script>
</body>
3.6 移动端事件 #
| 事件名 | 介绍 | 是否可冒泡 |
|---|---|---|
| touchstart | 触摸屏幕时触发的事件 | 是 |
| touchmove | 触摸点在屏幕上移动时触发的事件 | 是 |
| touchend | 触摸点离开屏幕时触发的事件 | 是 |
| touchcancel | 触摸事件被取消时触发的事件(如来电) | 是 |
| gesturestart | 当两个触摸点开始接触屏幕时触发的事件 | 否 |
| gesturechange | 当两个触摸点在屏幕上移动时触发的事件 | 否 |
| gestureend | 当两个触摸点离开屏幕时触发的事件 | 否 |
3.6.1 touchstart #
- touchstart事件是浏览器移动端的一个触摸事件。当用户在触摸设备的屏幕上放置一个或多个手指时,触发此事件。它适用于支持触摸操作的设备,如智能手机、平板电脑等
- 当touchstart事件触发时,它会提供一个包含触摸点信息的TouchEvent对象。此对象包含一些有关触摸点的重要属性,如以下几个触摸列表:
- touches:一个包含当前在屏幕上的所有触摸点的列表
- targetTouches:一个包含与事件目标元素相关的触摸点的列表
- changedTouches:一个包含自上次触摸事件以来发生变化的触摸点的列表
- 每个触摸点都由一个Touch对象表示,其中包含有关触摸点的信息,如:
- identifier:触摸点的唯一标识符
- clientX和clientY:相对于浏览器视口的触摸点的X和Y坐标
- pageX和pageY:相对于整个文档的触摸点的X和Y坐标
- screenX和screenY:相对于屏幕的触摸点的X和Y坐标
- target:触摸点所在的DOM元素
<body>
    <div id="container" style="width:200px;height:200px;background-color: lightgreen;"></div>
    <script>
        const container = document.getElementById('container');
        container.addEventListener("touchstart", function (event) {
            console.log('touchstart');
        });
    </script>
</body>
3.6.2 touchmove #
- touchmove事件是浏览器移动端的一个触摸事件。当用户在触摸设备的屏幕上移动一个或多个手指时,触发此事件。它适用于支持触摸操作的设备,如智能手机、平板电脑等
<body>
    <div id="container" style="width:200px;height:200px;background-color: lightgreen;"></div>
    <script>
        const container = document.getElementById('container');
        container.addEventListener("touchstart", function (event) {
            console.log('touchstart');
        });
        container.addEventListener("touchmove", function (event) {
            console.log('touchmove');
        });
    </script>
</body>
3.6.3 touchend #
- touchend事件是浏览器移动端的一个触摸事件。当用户在触摸设备的屏幕上抬起一个或多个手指时,触发此事件。它适用于支持触摸操作的设备,如智能手机、平板电脑等
<body>
    <div id="container" style="width:200px;height:200px;background-color: lightgreen;"></div>
    <script>
        const container = document.getElementById('container');
        container.addEventListener("touchstart", function (event) {
            console.log('touchstart');
        });
        container.addEventListener("touchmove", function (event) {
            console.log('touchmove');
        });
        container.addEventListener("touchend", function (event) {
            console.log('touchend');
        });
    </script>
</body>
3.7 取消默认行为 #
3.7.1 自定义菜单 #
<body>
    <div id="customElement">右键点击我查看自定义菜单</div>
    <ul id="contextMenu" style="display:none; position:absolute;">
        <li>选项1</li>
        <li>选项2</li>
        <li>选项3</li>
    </ul>
    <script>
        const customElement = document.getElementById("customElement");
        const contextMenu = document.getElementById("contextMenu");
        customElement.addEventListener("contextmenu", function (event) {
            event.preventDefault();
            contextMenu.style.display = "block";
            contextMenu.style.left = event.pageX + "px";
            contextMenu.style.top = event.pageY + "px";
        });
        document.addEventListener("click", function () {
            contextMenu.style.display = "none";
        });
    </script>
</body>
3.7.2 点击a #
<body>
    <a id="nav" href="http://www.baidu.com">百度</a>
    <script>
        const nav = document.getElementById('nav');
        nav.addEventListener("click", function (event) {
            if(event.preventDefault){
                event.preventDefault();
            }else{
            event.returnValue = false;
            }
            alert('click');
        });
    </script>
</body>
4.事件对象 #
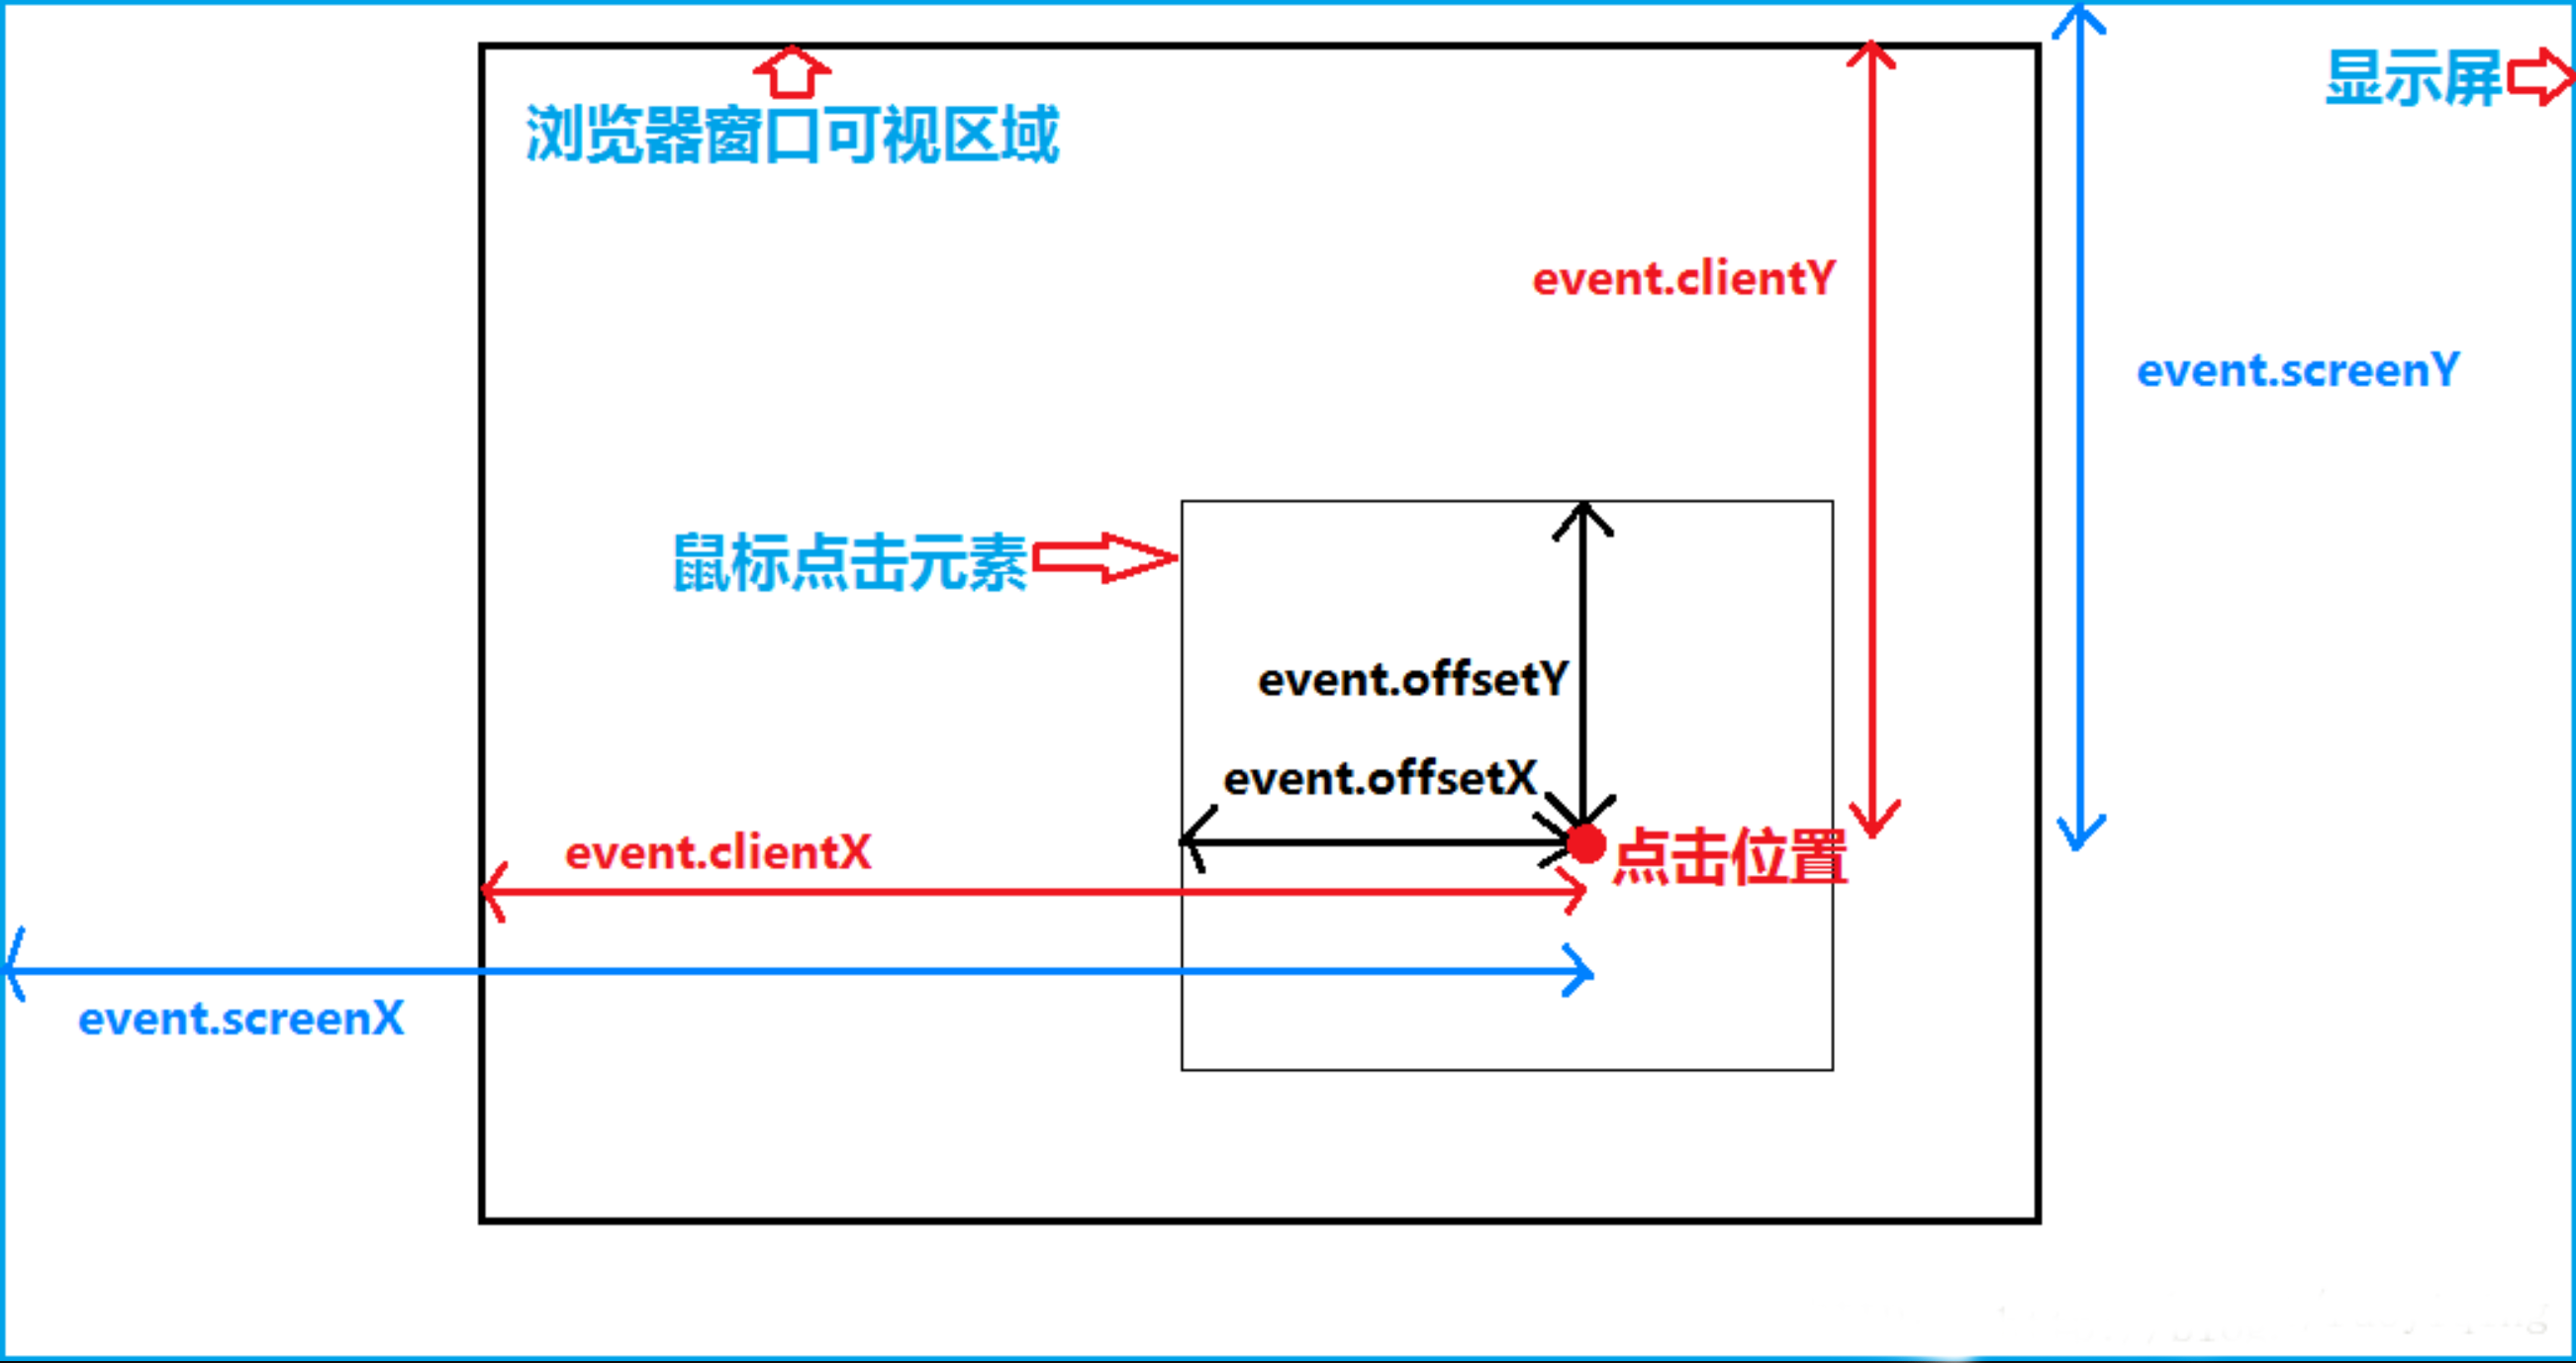
4.1 事件坐标 #
- 当在网页上处理鼠标或触摸事件时,事件对象提供了一系列有用的属性来获取鼠标或触摸点的位置信息
- 以下是这些属性的简要说明
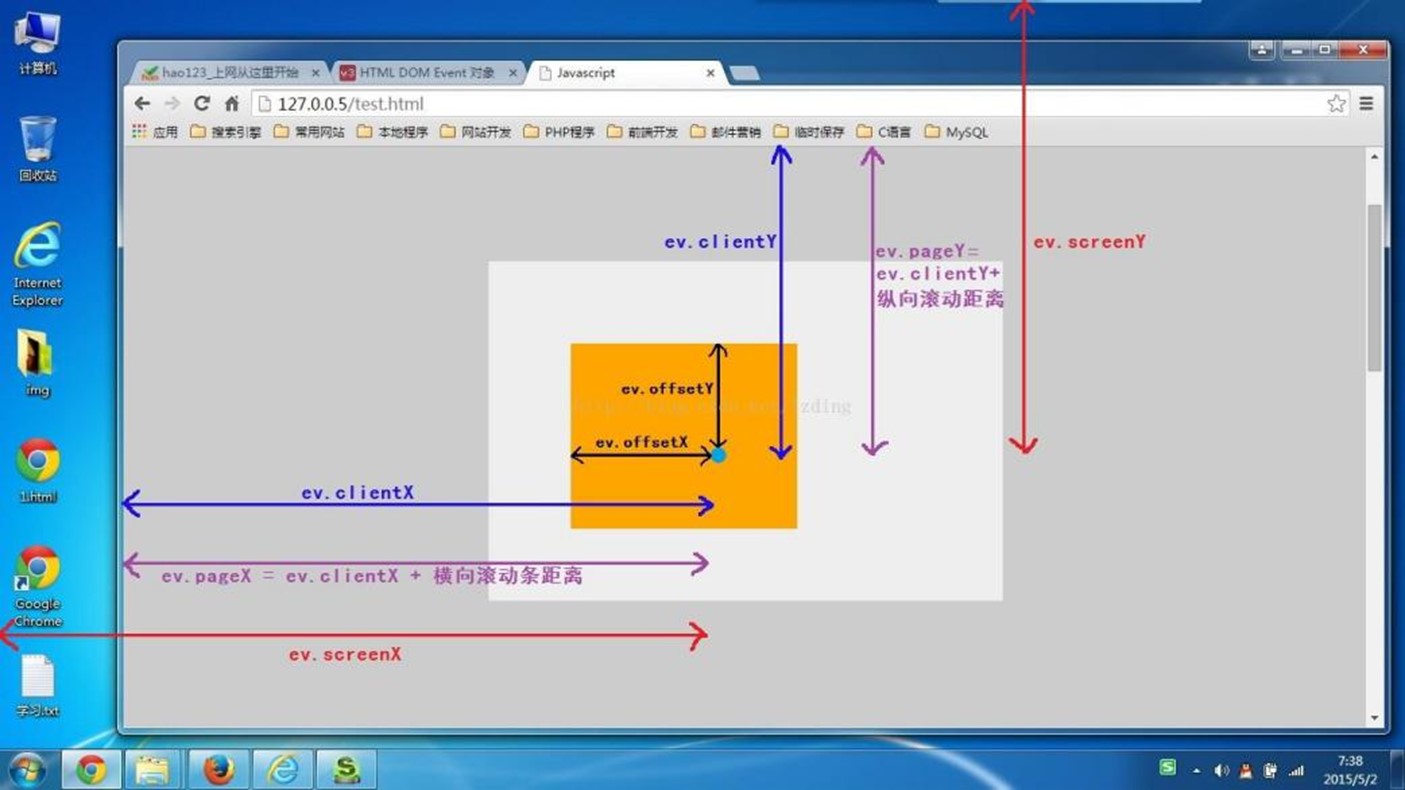
offsetX和offsetY属性表示事件触发点相对于事件目标元素的位置。换句话说,它们表示鼠标指针在目标元素内的坐标。这些坐标是相对于目标元素左上角的水平和垂直距离clientX和clientY属性表示事件触发点相对于浏览器视口的位置。视口是浏览器窗口内用于显示网页内容的区域。这些坐标是相对于视口左上角的水平和垂直距离,不包括滚动条pageX和pageY属性表示事件触发点相对于整个文档的位置。这些坐标是相对于文档左上角的水平和垂直距离,包括滚动条。换句话说,它们是基于文档的绝对坐标screenX和screenY属性表示事件触发点相对于屏幕的位置。这些坐标是相对于屏幕左上角的水平和垂直距离。需要注意的是,这些坐标与网页内容无关,而是基于物理屏幕的位置
- document 是一个全局对象,代表整个 HTML 文档。它提供了一组用于操作文档内容和结构的 API,例如获取元素、创建新元素、添加和删除事件监听器等
- document.documentElement 是一个指向 HTML 文档的根元素(html 标签)的引用。它可以用来访问和修改 html 标签的属性,以及获取与该标签相关的信息,例如视口尺寸等。document.documentElement 是 document 的子节点
- document.body 是一个指向 HTML 文档的 body 标签的引用。它可以用来访问和修改 body 标签的属性,以及获取与该标签相关的信息,例如文档内容的宽度和高度等。document.body 是 document.documentElement(html标签)的子节点
<head>
    <meta charset="UTF-8">
    <meta name="viewport" content="width=device-width, initial-scale=1.0">
    <title>Event Coordinates</title>
    <style>
        * {
            padding: 0;
            margin: 0;
        }

        body {
            height: 2000px;
        }

        #container {
            width: 200px;
            height: 200px;
            background-color: lightblue;
            display: flex;
            justify-content: center;
            align-items: center;
            position: absolute;
            top: 300px;
        }
    </style>
</head>

<body>
    <div id="container"></div>
    <script>
        //定义一个函数,用于将数字四舍五入到最接近的特定位数(默认为100)
        function roundToPlace(num, roundingPlace = 100) {
            return Math.round(num / roundingPlace) * roundingPlace;
        }
        //找到HTML中ID为'container'的元素
        const container = document.getElementById('container');
        //为该元素添加一个点击事件监听器
        container.addEventListener('click', (event) => {
            //在点击事件触发时,输出点击点的x坐标相对于触发事件元素的偏移量,并四舍五入到最近的100
            console.log('offsetX:', roundToPlace(event.offsetX));
            //输出点击点的x坐标相对于浏览器可视区的位置,并四舍五入到最近的100
            console.log('clientX:', roundToPlace(event.clientX));
            //输出点击点的x坐标相对于完整页面的位置,并四舍五入到最近的100
            console.log('pageX:', roundToPlace(event.pageX));
            //输出点击点的x坐标相对于用户电脑屏幕的位置,并四舍五入到最近的10
            console.log('screenX:', roundToPlace(event.screenX, 10));
            //以下四行与上面类似,但是输出的是y坐标而非x坐标
            console.log('offsetY:', roundToPlace(event.offsetY));
            console.log('clientY:', roundToPlace(event.clientY));
            console.log('pageY:', roundToPlace(event.pageY));
            console.log('screenY:', roundToPlace(event.screenY, 10));
        });
        //设置一个定时器,在1秒后将页面滚动到距离顶部100像素的位置
        setTimeout(() => {
            document.documentElement.scrollTop = 100;
        }, 1000);

    </script>
</body>
4.2 key和keyCode #
- 浏览器事件对象提供了key和keyCode属性,用于表示按下的键盘按键
key属性表示按下的按键的描述性字符串。例如,当按下 "A" 键时,key 的值为 "a"。同样,当按下方向键时,key 的值为 "ArrowUp"、"ArrowDown"、"ArrowLeft" 或 "ArrowRight"- keyCode属性表示按下的按键的数字代码。与key属性不同,keyCode不是一个字符串,而是一个整数。每个按键都有一个特定的数字代码。例如,方向键的数字代码分别为:上(38),下(40),左(37),右(39)
- 需要注意的是,keyCode属性在现代浏览器中已被废弃,不建议使用。取而代之的是使用key属性
<!DOCTYPE html>
<html lang="en">
<head>
    <meta charset="UTF-8">
    <meta name="viewport" content="width=device-width, initial-scale=1.0">
    <title>Moving Square</title>
    <style>
        * {
            padding: 0;
            margin: 0;
        }

        #box {
            position: absolute;
            width: 100px;
            height: 100px;
            background-color: lightblue;
        }
    </style>
</head>

<body>
    <div id="box"></div>
    <script>
      //获取ID为'box'的元素
      const box = document.getElementById('box');
      //获取该元素距离页面顶部的距离
      let offsetTop = box.offsetTop;
      //获取该元素距离页面左边的距离
      let offsetLeft = box.offsetLeft;
      //定义移动步长为10px
      const step = 10;
      //定义一个函数,用于根据键盘的方向键移动box元素
      function moveBox(event) {
          switch (event.key) {
              //如果按下的是向上的方向键,则box元素向上移动
              case 'ArrowUp':
                  offsetTop -= step;
                  break;
              //如果按下的是向下的方向键,则box元素向下移动
              case 'ArrowDown':
                  offsetTop += step;
                  break;
              //如果按下的是向左的方向键,则box元素向左移动
              case 'ArrowLeft':
                  offsetLeft -= step;
                  break;
              //如果按下的是向右的方向键,则box元素向右移动
              case 'ArrowRight':
                  offsetLeft += step;
                  break;
          }
          //更新box元素的top样式,使其移动到新的位置
          box.style.top = `${offsetTop}px`;
          //更新box元素的left样式,使其移动到新的位置
          box.style.left = `${offsetLeft}px`;
      }
      //为整个文档添加一个键盘按下的事件监听器,当按下键盘时,调用moveBox函数
      document.addEventListener('keydown', moveBox);

    </script>
</body>
</html>
4.3 事件代理委托 #
- 事件代理(Event Delegation)是一种在 JavaScript 中处理事件的技巧
- 事件代理利用了事件冒泡(Event Bubbling)的机制,将事件监听器(Event Listener)添加到父元素上,而不是直接添加到目标子元素
- 当子元素的事件被触发时,事件会冒泡到父元素,从而触发在父元素上的事件监听器。这种方法可以有效减少添加到 DOM 元素的事件监听器的数量,提高性能。
- 事件代理有以下优点:
- 减少事件监听器的数量,节省内存和提高性能。
- 动态添加或删除子元素时,无需重新绑定事件监听器。
- 可以在子元素上捕获和处理事件,即使它们在事件监听器被添加时尚不存在
<body>
    <ul id="list">
        <li>Item 1</li>
        <li>Item 2</li>
        <li>Item 3</li>
    </ul>

    <script>
      //获取ID为'list'的元素
      const list = document.getElementById("list");
      //为该元素添加一个点击事件监听器
      list.addEventListener("click", function (event) {
          //检查点击的目标元素是否为列表项('LI')
          if (event.target.tagName === "LI") {
              //如果是,弹出一个警告框,显示点击的列表项的内容
              alert("You clicked on: " + event.target.textContent);
          }
      });
    </script>
</body>
4.4 拖拽 #
offsetX和offsetY属性表示事件触发点相对于事件目标元素的位置。换句话说,它们表示鼠标指针在目标元素内的坐标。这些坐标是相对于目标元素左上角的水平和垂直距离clientX和clientY属性表示事件触发点相对于浏览器视口的位置。视口是浏览器窗口内用于显示网页内容的区域。这些坐标是相对于视口左上角的水平和垂直距离,不包括滚动条- offsetLeft 和 offsetTop 是 DOM 元素的两个属性,它们分别表示元素左边缘(offsetLeft)和上边缘(offsetTop)相对于其offsetParent的距离
- offsetParent 是一个指向离当前元素最近的、具有定位属性(position 为 relative、absolute 或 fixed)的祖先元素。如果没有符合条件的祖先元素,offsetParent 将是 body 或 html 元素
<head>
    <meta charset="UTF-8">
    <meta name="viewport" content="width=device-width, initial-scale=1.0">
    <title>Simple Drag and Drop Example</title>
    <link rel="stylesheet" href="https://cdnjs.cloudflare.com/ajax/libs/meyer-reset/2.0/reset.min.css">
    <style>
        .draggable {
            width: 100px;
            height: 100px;
            background-color: red;
            position: absolute;
            cursor: move;
        }
    </style>
</head>

<body>
    <div class="draggable" id="draggable"></div>
    <script>
        //获取ID为'draggable'的元素
        const draggable = document.getElementById("draggable");
        //定义两个变量用于保存鼠标与拖动元素的偏移量
        let offsetX = 0;
        let offsetY = 0;
        //定义一个标志位,表示当前是否正在拖动
        let dragging = false;
        //为拖动元素添加一个鼠标按下的事件监听器
        draggable.addEventListener("mousedown", (event) => {
            //当鼠标按下时,开始拖动
            dragging = true;
            //计算鼠标点击点与拖动元素左边界和上边界的偏移量
            offsetX = event.clientX - draggable.offsetLeft;
            offsetY = event.clientY - draggable.offsetTop;
            //以下两行代码是另一种获取偏移量的方法,但这里被注释掉了
            //offsetX = event.offsetX;
            //offsetY = event.offsetY;
        });
        //为整个文档添加一个鼠标移动的事件监听器
        document.addEventListener("mousemove", function (event) {
            //如果正在拖动,更新拖动元素的位置
            if (dragging) {
                draggable.style.left = event.clientX - offsetX + "px";
                draggable.style.top = event.clientY - offsetY + "px";
            }
        });
        //为整个文档添加一个鼠标抬起的事件监听器
        document.addEventListener("mouseup", function () {
            //当鼠标抬起时,停止拖动
            dragging = false;
        });
    </script>
</body>
4.5 拖拽边缘检测 #
<head>
    <meta charset="UTF-8">
    <meta name="viewport" content="width=device-width, initial-scale=1.0">
    <title>Simple Drag and Drop Example</title>
    <link rel="stylesheet" href="https://cdnjs.cloudflare.com/ajax/libs/meyer-reset/2.0/reset.min.css">
    <style>
        .draggable {
            width: 100px;
            height: 100px;
            background-color: red;
            position: absolute;
            cursor: move;
        }
    </style>
</head>

<body>
    <div class="draggable" id="draggable"></div>
    <script>
      //获取ID为'draggable'的元素
      const draggable = document.getElementById("draggable");
      //定义两个变量用于保存鼠标与拖动元素的偏移量
      let offsetX = 0;
      let offsetY = 0;
      //定义一个标志位,表示当前是否正在拖动
      let dragging = false;
      //为拖动元素添加一个鼠标按下的事件监听器
      draggable.addEventListener("mousedown", (event) => {
          //当鼠标按下时,开始拖动
          dragging = true;
          //计算鼠标点击点与拖动元素左边界和上边界的偏移量
          offsetX = event.clientX - draggable.offsetLeft;
          offsetY = event.clientY - draggable.offsetTop;
          //以下两行代码是另一种获取偏移量的方法,但这里被注释掉了
          //offsetX = event.offsetX;
          //offsetY = event.offsetY;
      });
      //为整个文档添加一个鼠标移动的事件监听器
      document.addEventListener("mousemove", function (event) {
          //如果正在拖动,更新拖动元素的位置
          if (dragging) {
              //计算新的位置
              const newX = event.clientX - offsetX;
              const newY = event.clientY - offsetY;
              //计算窗口的右边界和底边界
              const maxLeft = document.documentElement.clientWidth - draggable.offsetWidth;
              const maxTop = document.documentElement.clientHeight - draggable.offsetHeight;
              //确保新的位置不超过窗口的边界
              const clampedX = Math.max(0, Math.min(newX, maxLeft));
              const clampedY = Math.max(0, Math.min(newY, maxTop));
              //更新元素的位置
              draggable.style.left = clampedX + "px";
              draggable.style.top = clampedY + "px";
          }
      });
      //为整个文档添加一个鼠标抬起的事件监听器
      document.addEventListener("mouseup", function () {
          //当鼠标抬起时,停止拖动
          dragging = false;
      });
    </script>
</body>
4.6 多元素拖拽 #
<!DOCTYPE html>
<html lang="en">

<head>
    <meta charset="UTF-8">
    <meta name="viewport" content="width=device-width, initial-scale=1.0">
    <style>
        .box {
            position: absolute;
            width: 100px;
            height: 100px;
            background-color: lightblue;
            cursor: move;
        }
    </style>
</head>

<body>
    <div class="box" style="left: 50px; top: 50px;"></div>
    <div class="box" style="left: 50px; top: 200px;"></div>
    <div class="box" style="left: 50px; top: 350px;"></div>
    <script>
      //定义一个变量用于保存当前正在拖动的元素
      let currentDragging = null;
      //获取所有class为'box'的元素
      const boxes = document.querySelectorAll('.box');
      //为每个元素添加一个鼠标按下的事件监听器
      boxes.forEach(box => {
          box.addEventListener('mousedown', (e) => {
              //当鼠标按下时,设置当前正在拖动的元素为该元素,并计算鼠标相对于元素的偏移量
              currentDragging = box;
              currentDragging.dataset.offsetX = e.offsetX;
              currentDragging.dataset.offsetY = e.offsetY;
          });
      });
      //为整个文档添加一个鼠标移动的事件监听器
      document.addEventListener('mousemove', (e) => {
          //如果当前没有正在拖动的元素,则直接返回
          if (!currentDragging) return;
          //如果有正在拖动的元素,则更新元素的位置
          currentDragging.style.left = (e.clientX - currentDragging.dataset.offsetX) + 'px';
          currentDragging.style.top = (e.clientY - currentDragging.dataset.offsetY) + 'px';
      });
      //为整个文档添加一个鼠标抬起的事件监听器
      document.addEventListener('mouseup', () => {
          //当鼠标抬起时,清空当前正在拖动的元素
          currentDragging = null;
      });
    </script>
</body>

</html>
4.7 碰撞检测 #
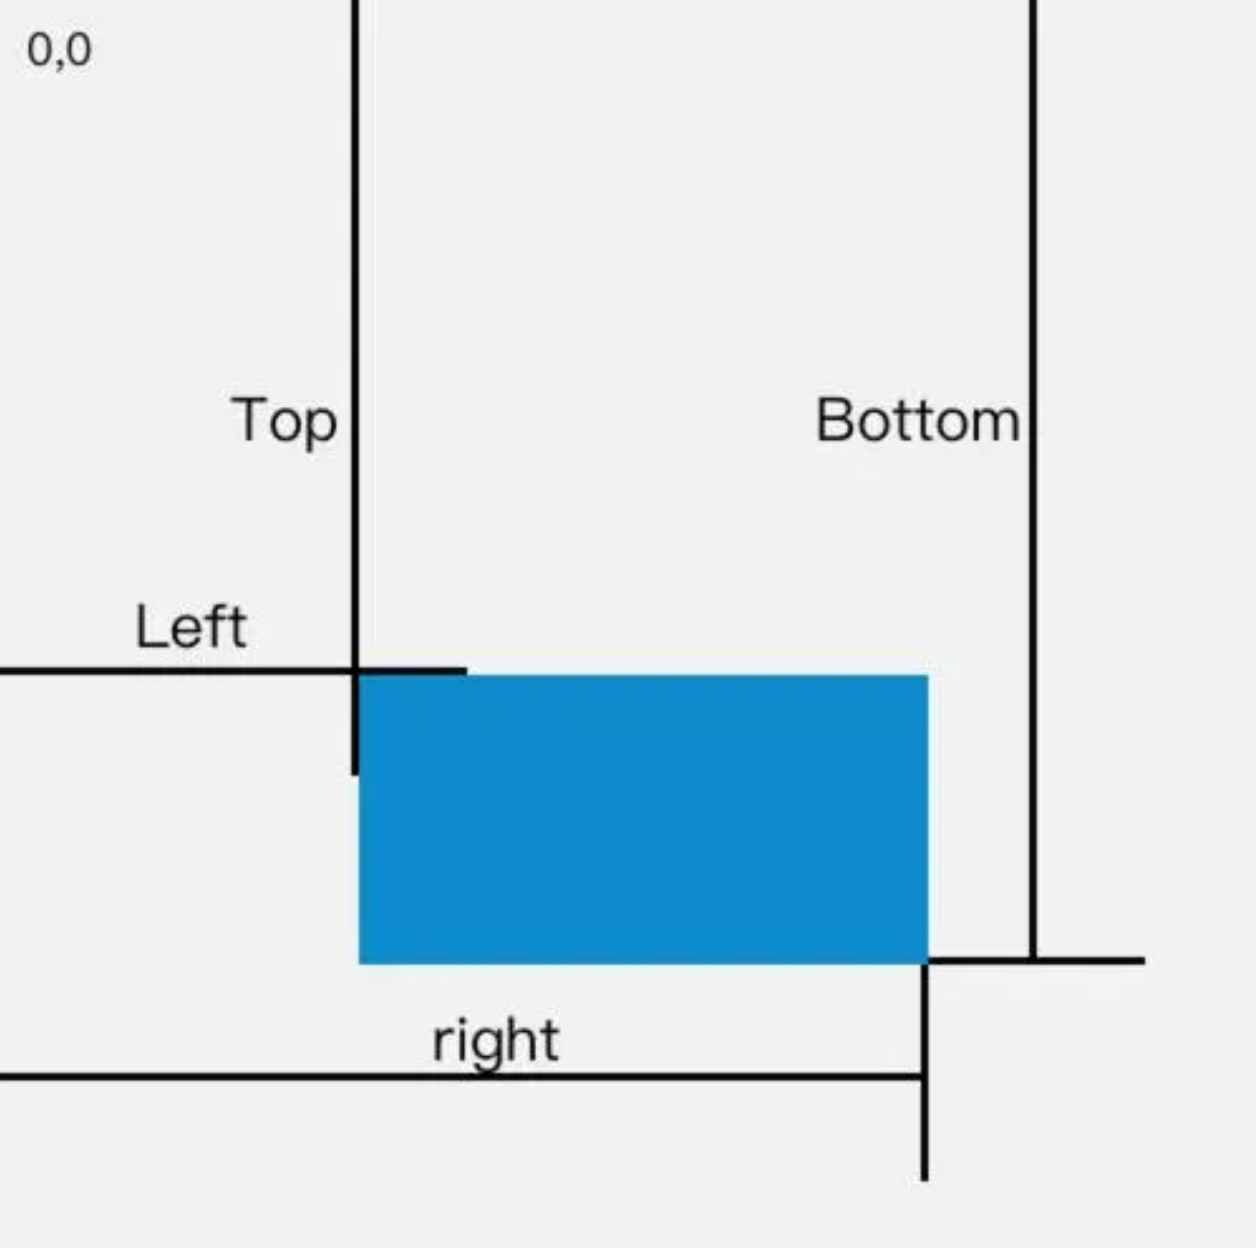
- 判断两个矩形是否相交(碰撞)的条件。每个条件对应于一个边界检查
proposedX < boxRect.right:这个条件检查当前拖动元素的左边是否在另一个元素的右边之左。如果是,那么这两个元素可能在水平方向上重叠proposedX + currentDragging.offsetWidth > boxRect.left:这个条件检查当前拖动元素的右边是否在另一个元素的左边之右。如果是,那么这两个元素可能在水平方向上重叠。proposedY < boxRect.bottom:这个条件检查当前拖动元素的顶边是否在另一个元素的底边之上。如果是,那么这两个元素可能在垂直方向上重叠proposedY + currentDragging.offsetHeight > boxRect.top:这个条件检查当前拖动元素的底边是否在另一个元素的顶边之下。如果是,那么这两个元素可能在垂直方向上重叠。
如果上述所有条件都为真,那么这两个元素在水平和垂直方向上都有重叠,因此我们可以判断它们发生了碰撞。如果任何一个条件为假,那么这两个元素就没有碰撞
<!DOCTYPE html>
<html lang="en">

<head>
    <meta charset="UTF-8">
    <meta name="viewport" content="width=device-width, initial-scale=1.0">
    <style>
        .box {
            position: absolute;
            width: 100px;
            height: 100px;
            cursor: move;
        }
    </style>
</head>

<body>
    <div class="box" style="left: 50px; top: 50px;background-color: lightcoral;"></div>
    <div class="box" style="left: 50px; top: 200px;background-color: lightblue;"></div>
    <div class="box" style="left: 50px; top: 350px;background-color: lightseagreen;"></div>
    <script>
        // 声明一个变量,用于保存当前正在拖动的元素
        let currentDragging = null;
        // 获取页面上所有 class 为 'box' 的元素
        const boxes = document.querySelectorAll('.box');
        // 为每个 box 元素添加鼠标按下事件监听器
        boxes.forEach(box => {
            box.addEventListener('mousedown', (e) => {
                // 当鼠标按下时,将当前元素设置为正在拖动的元素
                // 并且计算鼠标相对于元素的 x 和 y 坐标的偏移
                currentDragging = box;
                currentDragging.dataset.offsetX = e.offsetX;
                currentDragging.dataset.offsetY = e.offsetY;
            });
        });
        // 为整个文档添加鼠标移动事件监听器
        document.addEventListener('mousemove', (e) => {
            // 如果当前没有元素正在被拖动,直接返回
            if (!currentDragging) return;
            // 计算预期的新位置
            const proposedX = e.clientX - currentDragging.dataset.offsetX;
            const proposedY = e.clientY - currentDragging.dataset.offsetY;
            // 遍历所有的 box 元素
            for (const box of boxes) {
                // 如果是当前正在拖动的元素,跳过
                if (box === currentDragging) continue;
                // 获取元素的位置和尺寸
                const boxRect = box.getBoundingClientRect();
                // 如果预期的新位置和其他元素发生了碰撞,直接返回
                if (
                    proposedX < boxRect.right &&
                    proposedX + currentDragging.offsetWidth > boxRect.left &&
                    proposedY < boxRect.bottom &&
                    proposedY + currentDragging.offsetHeight > boxRect.top
                ) {
                    return;
                }
            }
            // 如果没有碰撞,更新元素的位置
            currentDragging.style.left = proposedX + 'px';
            currentDragging.style.top = proposedY + 'px';
        });

        // 为整个文档添加鼠标抬起事件监听器
        document.addEventListener('mouseup', () => {
            // 当鼠标抬起时,清除当前正在拖动的元素
            currentDragging = null;
        });
    </script>
</body>
</html>
4.8 放大镜 #
<!DOCTYPE html>
<html lang="en">

<head>
    <meta charset="UTF-8">
    <meta http-equiv="X-UA-Compatible" content="IE=edge">
    <meta name="viewport" content="width=device-width, initial-scale=1.0">
    <link rel="stylesheet" href="https://cdnjs.cloudflare.com/ajax/libs/meyer-reset/2.0/reset.min.css">
    <style>
        body {
            display: flex;
            padding: 100px;
        }

        .container {
            position: relative;
            width: 300px;
            height: 300px;
            display: inline-block;
        }

        .container img {
            width: 100%;
            height: 100%;
        }

        .magnifier {
            width: 100px;
            background: rgba(0, 0, 0, 0.2);
            position: absolute;
            left: 0;
            top: 0;
        }

        .preview {
            width: 300px;
            position: relative;
            display: inline-block;
            overflow: hidden;
        }

        .preview img {
            position: absolute;
            left: 0;
            top: 0;
        }
    </style>
    <title>magnifier</title>
</head>

<body>
    <!-- HTML结构部分 -->
    <div class="container">
        <img src="images/small.jpg" />
        <div class="magnifier"></div>
    </div>
    <div class="preview">
        <img src="images/big.jpg" />
    </div>
    <script>
        // 获取相关的DOM元素
        const container = document.querySelector('.container');
        const magnifier = document.querySelector('.magnifier');
        const preview = document.querySelector('.preview');
        const largeImg = document.querySelector('.preview img');
        // 计算容器的宽高比 clientHeight=2,clientWidth=1,containerRatio=2
        const containerRatio = container.clientHeight / container.clientWidth;
        // 设置放大镜的高度,以保持宽高比一致
        magnifier.style.height = magnifier.clientWidth * containerRatio + 'px';
        // 设置预览框的宽高
        preview.style.height = preview.clientWidth * containerRatio + 'px';
        // 计算预览框放大的比例
        const scale = preview.clientWidth / magnifier.clientWidth;
        // 设置放大图像的宽度和高度
        largeImg.style.width = container.clientWidth * scale + 'px';
        largeImg.style.height = container.clientHeight * scale + 'px';
        // 监听容器的鼠标移动事件
        container.addEventListener('mousemove', (e) => {
            const rect = container.getBoundingClientRect();
            let x = e.clientX - rect.left - magnifier.clientWidth / 2;
            let y = e.clientY - rect.top - magnifier.clientHeight / 2;
            // 限制放大镜的位置在容器范围内
            x = Math.max(0, Math.min(x, container.clientWidth - magnifier.clientWidth));
            y = Math.max(0, Math.min(y, container.clientHeight - magnifier.clientHeight));
            // 设置放大镜的位置和显示
            magnifier.style.left = x + 'px';
            magnifier.style.top = y + 'px';
            magnifier.style.display = 'block';
            // 设置放大图像的位置和显示
            largeImg.style.left = -x * scale + 'px';
            largeImg.style.top = -y * scale + 'px';
            largeImg.style.display = 'block';
        });
        // 监听容器的鼠标离开事件
        container.addEventListener('mouseleave', () => {
            // 隐藏放大镜和放大图像
            magnifier.style.display = 'none';
            largeImg.style.display = 'none';
        });
    </script>
</body>
</html>
4.9 树型菜单 #
<!DOCTYPE html>
<html lang="en">

<head>
    <meta charset="UTF-8">
    <title>树形菜单</title>
    <link rel="stylesheet" href="https://cdnjs.cloudflare.com/ajax/libs/meyer-reset/2.0/reset.min.css">
    <style>
        .tree-menu {
            display: none;
        }

        .tree-menu.top-level {
            display: block;
        }

        .tree-menu li {
            position: relative;
            font-size: 16px;
            padding-left: 16px;
            line-height: 32px;
        }

        .tree-menu .toggle-icon {
            position: absolute;
            left: 0;
            top: 10px;
            width: 12px;
            height: 12px;
            font-size: 12px;
            line-height: 12px;
            text-align: center;
            border: 1px solid #AAA;
            cursor: pointer;
        }
    </style>
</head>

<body>
    <ul class="tree-menu top-level" id="treeMenu"></ul>
    <script>
        //获取ID为'treeMenu'的元素
        const treeMenu = document.getElementById("treeMenu");
        //为该元素添加一个点击事件监听器
        treeMenu.onclick = function (e) {
            //获取点击的目标元素和它的下一个兄弟元素
            let target = e.target;
            let submenu = target.nextElementSibling;
            //如果点击的目标元素有'toggle-icon'类,并且存在下一个兄弟元素,则切换目标元素的'open'类,并切换下一个兄弟元素的显示状        态
            if (target.classList.contains("toggle-icon") && submenu) {
                target.classList.toggle("open");
                submenu.style.display = submenu.style.display === "block" ? "none" : "block";
            }
        };
        //定义一个函数,根据数据渲染树形菜单的HTML
        function renderTree(data) {
            let html = "";
            data.forEach(item => {
                let { name, children, open } = item;
                html += `
                    <li>
                        <span>${name}</span>
                        ${children ? `<em class="toggle-icon${open ? ' open' : ''}">${open ? '-' : '+'}</em>` : ``}
                        ${children ?
                        `<ul class="tree-menu" style="display: ${open ? 'block' : 'none'};">
                            ${renderTree(children)}
                        </ul>`: ``
                    }
                    </li>`;
            });
            return html;
        }
        let xhr = new XMLHttpRequest();
        xhr.open("get", "https://static.zhufengpeixun.com/data_1684067863819.json");
        xhr.onreadystatechange = function () {
            //当请求成功完成时,解析响应数据并调用resolve函数
            if (xhr.readyState === 4 && xhr.status === 200) {
                let data = JSON.parse(xhr.response);
                let treeHTML = renderTree(data);
                treeMenu.innerHTML = treeHTML;
            }
        };
        xhr.send();
    </script>
</body>
</html>
5.参考 #
5.1 reset #
- https://cdnjs.cloudflare.com/ajax/libs/meyer-reset/2.0/reset.min.css
- https://static.zhufengpeixun.com/resetmin_1683910437062.css
5.2 window和document #
- window 对象:将键盘事件绑定到整个窗口。当用户在浏览器窗口内按下键盘上的键时,将触发事件。这种方法适用于处理全局快捷键或游戏控制等场景
- document 对象:将键盘事件绑定到整个文档。与 window 对象类似,当用户在页面内按下键盘上的键时,将触发事件
- HTML 元素:将键盘事件绑定到具体的 HTML 元素,如输入框、按钮、文本域等。此类对象通常使用 tabindex 属性来设置焦点顺序。当用户在特定元素上操作键盘时,才会触发事件
5.3 innerWidth和innerHeight #
window.innerWidth和window.innerHeight是 JavaScript 中的两个属性,它们分别表示浏览器窗口的视口(viewport)宽度和高度。视口是用户在浏览器窗口中能够看到的网页区域window.innerWidth:这个属性表示浏览器视口的宽度(以像素为单位),包括滚动条(如果有的话)。当用户调整浏览器窗口大小时,这个值会发生变化。这个属性在确定网页布局或响应式设计中的断点时非常有用window.innerHeight:这个属性表示浏览器视口的高度(以像素为单位),同样包括滚动条(如果有的话)。当用户调整浏览器窗口大小时,这个值也会发生变化。这个属性在计算网页元素的位置和大小时非常有用,特别是对于那些需要根据窗口高度进行调整的元素- 请注意,这两个属性返回的是视口的尺寸,而不是整个网页的尺寸。当网页内容超出视口大小时,这些属性不会反映实际内容尺寸,而只表示用户当前能够看到的区域大小
- outerWidth 和 outerHeight 属性分别表示浏览器窗口的外部宽度和高度,包括浏览器的边框、工具栏和滚动条等。这两个属性以像素为单位
window.outerWidth属性表示浏览器窗口的总宽度,包括窗口边框、工具栏、菜单栏、书签栏和其他浏览器相关部分。这个属性是只读的window.outerHeight属性表示浏览器窗口的总高度,包括窗口边框、工具栏、菜单栏、书签栏和其他浏览器相关部分。这个属性也是只读的document.documentElement.clientWidth属性表示文档根元素的可见宽度,包括内边距(padding),但不包括边框(border)、外边距(margin)和滚动条。这个属性以像素为单位。它常用于获取页面内容的可见宽度document.documentElement.clientHeight属性表示文档根元素的可见高度,包括内边距(padding),但不包括边框(border)、外边距(margin)和滚动条。这个属性以像素为单位。它常用于获取页面内容的可见高度- 在大多数情况下,
window.innerWidth会大于或等于document.documentElement.clientWidth

<body>
    <button onclick="displayViewportSize()">Show Viewport Size</button>
    <script>
        function displayViewportSize() {
            const innerWidth = window.innerWidth;
            const innerHeight = window.innerHeight;
            let outerWidth = window.outerWidth;
            let outerHeight = window.outerHeight;
            console.log('innerWidth',innerWidth);
            console.log('innerHeight',innerHeight);
            console.log('outerWidth',outerWidth);
            console.log('outerHeight',outerHeight);
        }
    </script>
</body>
5.4 DOM元素 #
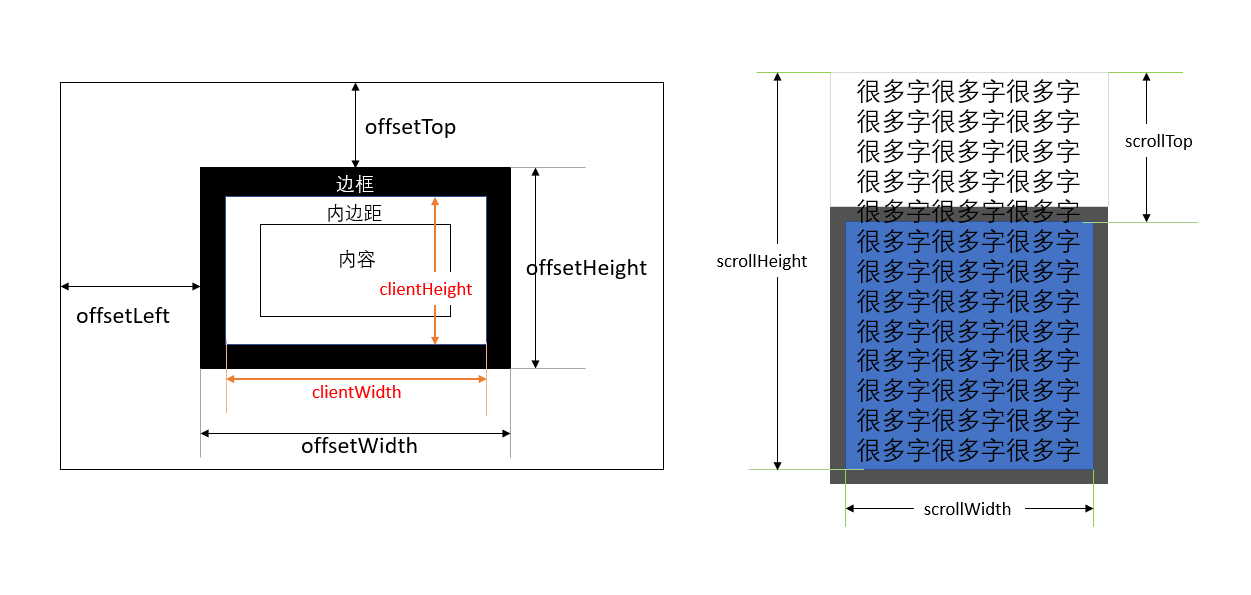
- clientWidth:元素的可见宽度(包括内边距,但不包括边框、滚动条)
- clientHeight:元素的可见高度(包括内边距,但不包括边框、滚动条)
- offsetWidth:元素的可见宽度(包括内边距、边框和滚动条)
- offsetHeight:元素的可见高度(包括内边距、边框和滚动条)
- scrollWidth:元素内容的总宽度(包括溢出容器的部分),包括内边距,但不包括边框、滚动条
- scrollHeight:元素内容的总高度(包括溢出容器的部分),包括内边距,但不包括边框、滚动条
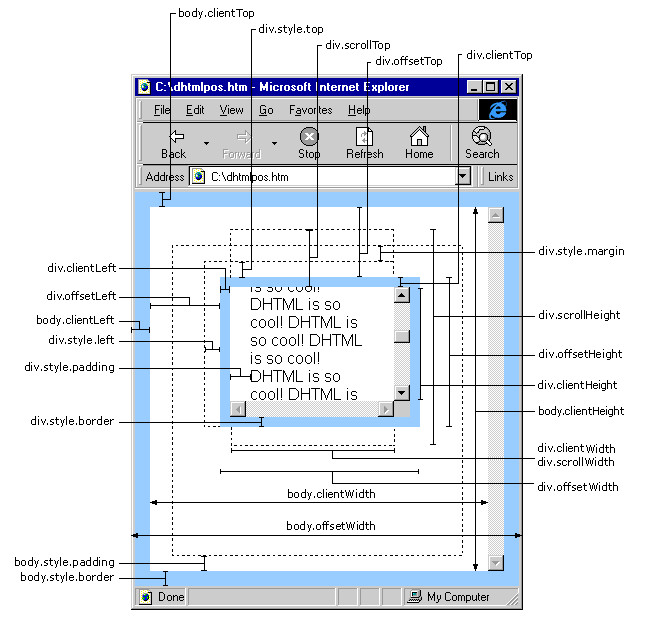
- offsetLeft:元素相对于其最近的有定位属性的父级元素(offsetParent)的左偏移量
- offsetTop:元素相对于其最近的有定位属性的父级元素(offsetParent)的顶部偏移量
- scrollLeft:元素内容区域的水平滚动距离
- scrollTop:元素内容区域的垂直滚动距离
- clientLeft 属性表示元素左边框的宽度(以像素为单位)。如果元素没有左边框,那么此属性的值为 0。请注意,这个属性只读,无法通过 clientLeft 修改元素的左边框宽度
- clientTop 属性表示元素顶部边框的高度(以像素为单位)。如果元素没有顶部边框,那么此属性的值为 0。与 clientLeft 类似,这个属性也是只读的,无法通过 clientTop 修改元素的顶部边框高度
- style.left 属性表示元素的左侧位置。这个属性对应于 CSS 的 left 属性。当元素的定位方式为 relative、absolute 或 fixed 时,style.left 属性可用于获取或设置元素相对于其最近的定位上下文元素的左偏移量。需要注意的是,style.left 的值包含了单位,通常是 "px"(像素)
- style.top 属性表示元素的顶部位置。这个属性对应于 CSS 的 top 属性。当元素的定位方式为 relative、absolute 或 fixed 时,style.top 属性可用于获取或设置元素相对于其最近的定位上下文元素的顶部偏移量。与 style.left 类似,style.top 的值也包含了单位,通常是 "px"(像素)
5.5 Event属性 #
offsetX和offsetY属性表示事件触发点相对于事件目标元素的位置。换句话说,它们表示鼠标指针在目标元素内的坐标。这些坐标是相对于目标元素左上角的水平和垂直距离clientX和clientY属性表示事件触发点相对于浏览器视口的位置。视口是浏览器窗口内用于显示网页内容的区域。这些坐标是相对于视口左上角的水平和垂直距离,不包括滚动条pageX和pageY属性表示事件触发点相对于整个文档的位置。这些坐标是相对于文档左上角的水平和垂直距离,包括滚动条。换句话说,它们是基于文档的绝对坐标screenX和screenY属性表示事件触发点相对于屏幕的位置。这些坐标是相对于屏幕左上角的水平和垂直距离。需要注意的是,这些坐标与网页内容无关,而是基于物理屏幕的位置
5.6 getBoundingClientRect #
- getBoundingClientRect()方法返回一个包含元素的大小及其相对于视口的位置的矩形对象。因此,box.getBoundingClientRect().left表示元素的左边缘相对于视口的水平距离。这意味着,无论页面是否发生滚动,此值都是相对于视口的当前可见部分计算的
- offsetLeft属性表示元素左外边框相对于其包含块(offsetParent)左内边框的距离。包含块(offsetParent)通常是距离元素最近的具有position属性值为relative、absolute、fixed或sticky的祖先元素。如果没有这样的祖先元素,offsetParent通常是body元素。这意味着offsetLeft是元素相对于其最近的定位祖先元素的位置
- box.getBoundingClientRect().left是相对于视口的水平位置.box.offsetLeft是相对于最近的定位祖先元素(或body)的水平位置
5.7 getComputedStyle #
getComputedStyle方法是一个用于获取计算后的样式值的 JavaScript 方法。它接受一个元素节点作为参数,并返回一个 CSSStyleDeclaration 对象,该对象包含了该元素应用的所有计算后的样式属性和对应的值- 使用
getComputedStyle方法可以获取元素的各种样式属性,包括尺寸、颜色、字体等等。这些样式属性可以是直接在元素上定义的样式,也可以是通过 CSS 继承、层叠等机制计算得出的样式 - 需要注意的是,getComputedStyle 方法返回的样式值都是字符串类型。如果需要使用具体的数值进行计算或比较,可能需要使用其他方法将字符串转换为合适的类型,例如使用 parseInt 或 parseFloat 进行解析
const element = document.getElementById('myElement');
const styles = getComputedStyle(element);
// 获取元素的背景颜色
const backgroundColor = styles.backgroundColor;
// 获取元素的字体大小
const fontSize = styles.fontSize;
// 获取元素的宽度和高度
const width = styles.width;
const height = styles.height;
5.8 DOM节点的属性 #
| 属性 | 作用 | 关注的节点类型 |
|---|---|---|
| nextElementSibling | 获取当前元素紧邻的下一个兄弟元素 元素节点 | |
| previousElementSibling | 获取当前元素紧邻的上一个兄弟元素 元素节点 | |
| firstElementChild | 获取当前元素的第一个子元素 元素节点 | |
| lastElementChild | 获取当前元素的最后一个子元素 元素节点 | |
| nextSibling | 获取当前节点紧邻的下一个兄弟节点,包括文本节点和注释节点 所有节点类型 | |
| previousSibling | 获取当前节点紧邻的上一个兄弟节点,包括文本节点和注释节点 所有节点类型 | |
| firstChild | 获取当前节点的第一个子节点,包括文本节点和注释节点 所有节点类型 | |
| lastChild | 获取当前节点的最后一个子节点,包括文本节点和注释节点 所有节点类型 |
5.9 classList #
- classList 是一个 DOM 元素(HTMLElement)的属性
- 它提供了一系列方法和属性,用于操作元素的类名(class)
- 它是一个实时更新的类数组对象,即使页面上的元素类发生改变,classList 也会实时反映这些变化
- 以下是 classList 的一些常用方法:
- add(): 添加一个或多个类名到元素。如果指定的类名已经存在,那么它不会被添加 用法:element.classList.add("class1", "class2", ...)
- remove(): 从元素中移除一个或多个类名。如果指定的类名不存在,那么它不会报错 用法:element.classList.remove("class1", "class2", ...)
- contains(): 检查元素是否包含指定的类名。如果包含,返回 true,否则返回 false 用法:element.classList.contains("class")
- toggle(): 切换一个类名。如果该类名存在,将其移除;如果不存在,则添加 用法:element.classList.toggle("class")
- replace(): 替换一个已存在的类名为新的类名。如果旧类名不存在,则不执行任何操作 用法:element.classList.replace("oldClass", "newClass")