1.全局组件 #
Vue.js 的组件是一种自定义元素,它们在技术上是 Vue 的实例,具有预定义的选项。组件是 Vue.js 的核心功能,因为它们允许你创建可重用的代码片段。
组件系统可以让你创建具有完全独立或者有深度复用的组件树,也就是说你可以创建一个复杂的页面,其中各部分是由相互关联的小组件构成的。这样可以提高代码的可维护性和可重用性。
全局组件在 Vue.js 中是很常见的,一旦定义,你就可以在任何 Vue 实例(也包括组件)的模板中使用它。
你可以使用 Vue.component() 方法在全局范围内注册一个组件。这个方法接收两个参数:组件的名字和组件的选项。
以下是创建全局组件的例子:
  <body>
    <div id="app">
      <counter></counter>
    </div>
    <script src="https://cdn.jsdelivr.net/npm/vue@2"></script>
    <script>
      Vue.component("counter", {
        data: function () {
          return {
            count: 0,
          };
        },
        template:
          '<button v-on:click="count++">{{ count }}</button>',
      });
      var vm = new Vue({
        el: "#app",
        data: {},
        methods: {},
      });
    </script>
  </body>
注意,全局注册的组件必须在注册之后的 Vue 实例(通过 new Vue 创建)中才可用。
虽然全局组件在很多情况下都很有用,但如果你的应用或网站有大量的组件,全局注册可能会导致命名冲突
2.局部组件 #
在 Vue.js 中,除了全局注册的组件,还可以创建局部组件。局部组件只能在声明它们的组件或 Vue 实例中使用,而不是在全局可用。
局部组件的创建和全局组件略有不同。你不再使用 Vue.component() 方法来注册组件,而是在另一个组件的选项中定义它,如下所示:
<body>
  <div id="app">
    <counter></counter>
  </div>
  <script src="https://cdn.jsdelivr.net/npm/vue@2"></script>
  <script>
    var vm = new Vue({
      el: "#app",
      components: {
        counter: {
          data: function () {
            return {
              count: 0,
            };
          },
          template: '<button v-on:click="count++">{{ count }}</button>',
        },
      },
    });
  </script>
</body>
局部注册的好处是,你不需要担心在全局命名冲突的问题,因为每个组件都有自己的作用域。
3.子组件生命周期 #
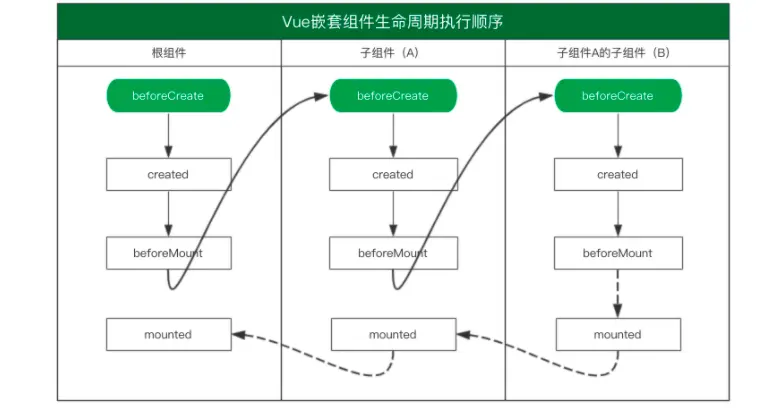
Vue.js中父子组件生命周期钩子的执行流程主要遵循如下步骤:
在创建阶段:
beforeCreate: 首先,父组件的
beforeCreate钩子方法会被触发。created: 其次,父组件的
created钩子方法会被触发。beforeCreate: 然后,子组件的
beforeCreate钩子方法会被触发。created: 接着,子组件的
created钩子方法会被触发。beforeMount: 之后,父组件的
beforeMount钩子方法会被触发。beforeMount: 接着,子组件的
beforeMount钩子方法会被触发。mounted: 接下来,子组件的
mounted钩子方法会被触发。mounted: 最后,父组件的
mounted钩子方法会被触发。
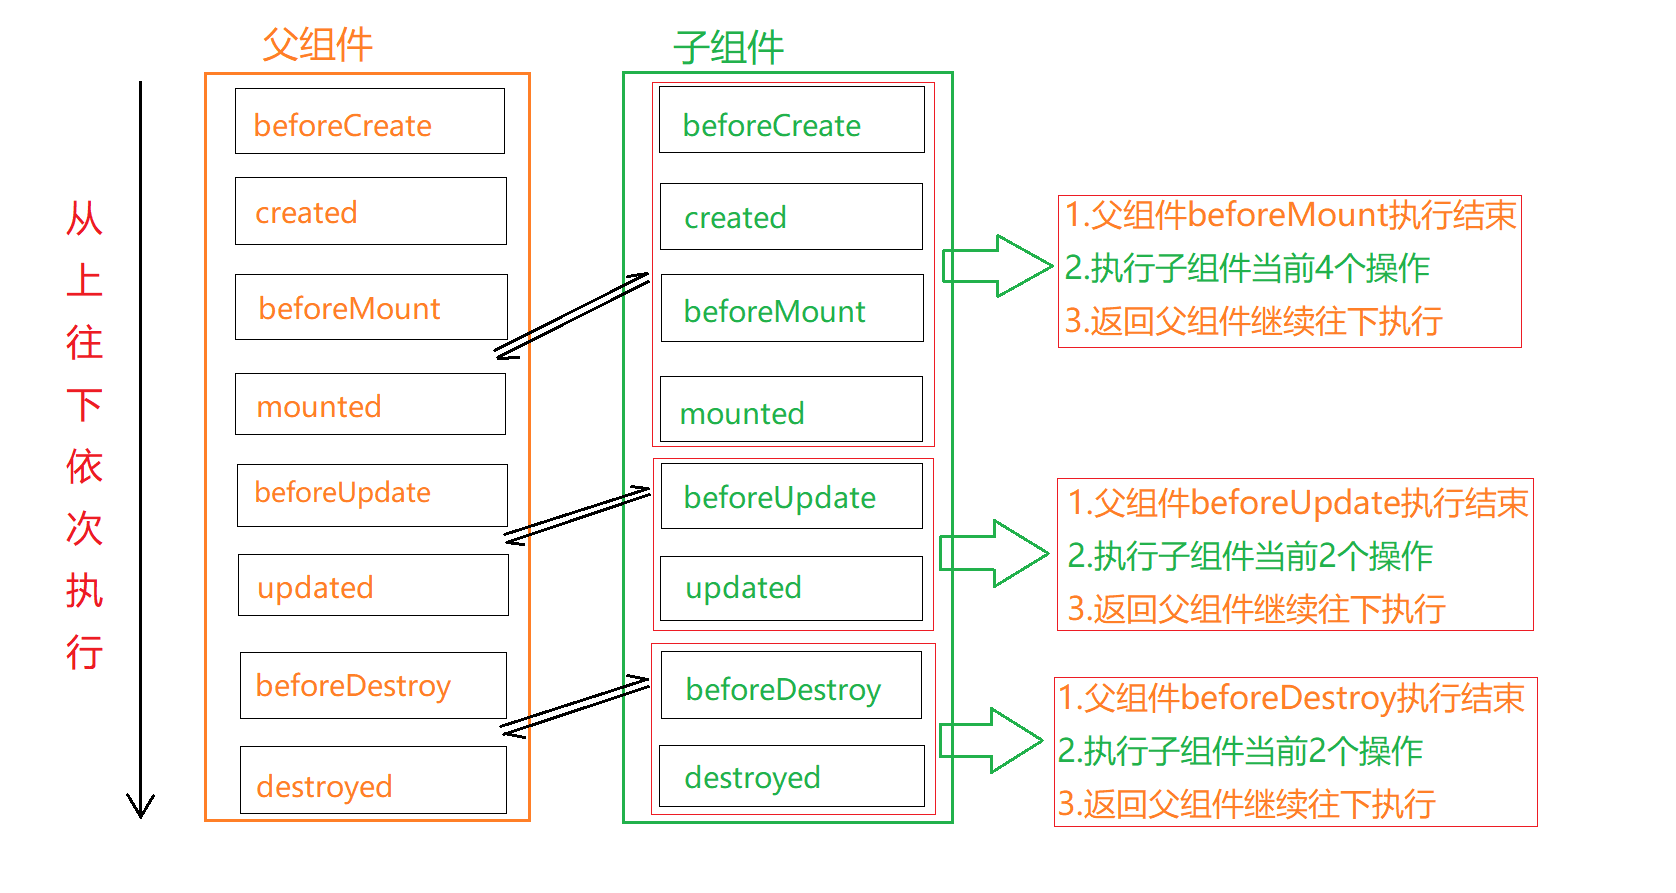
在更新阶段:
beforeUpdate: 首先,父组件的
beforeUpdate钩子方法会被触发。beforeUpdate: 然后,子组件的
beforeUpdate钩子方法会被触发。updated: 接着,子组件的
updated钩子方法会被触发。updated: 最后,父组件的
updated钩子方法会被触发。
在销毁阶段:
beforeDestroy: 首先,父组件的
beforeDestroy钩子方法会被触发。beforeDestroy: 然后,子组件的
beforeDestroy钩子方法会被触发。destroyed: 接着,子组件的
destroyed钩子方法会被触发。destroyed: 最后,父组件的
destroyed钩子方法会被触发。
这种顺序的设置使得父组件能在它的钩子中控制子组件的生命周期,这是Vue.js设计的一部分。在实际的开发中,理解和利用好这些生命周期钩子可以帮助我们更好地管理组件的行为和状态。
3.1 创建阶段 #
<!DOCTYPE html>
<html lang="en">
<head>
    <meta charset="UTF-8">
    <meta name="viewport" content="width=device-width, initial-scale=1.0">
    <title>Vue Lifecycle Demo</title>
</head>
<body>
    <div id="app">
        <child-component></child-component>
    </div>
    <script src="https://cdn.jsdelivr.net/npm/vue@2"></script>
    <script>
        Vue.component('child-component', {
            template: '<div>Child Component</div>',
            beforeCreate: function() {
                console.log('Child beforeCreate');
            },
            created: function() {
                console.log('Child created');
            },
            beforeMount: function() {
                console.log('Child beforeMount');
            },
            mounted: function() {
                console.log('Child mounted');
            }
        });
        new Vue({
            el: '#app',
            template: '<div><child-component></child-component></div>',
            beforeCreate: function() {
                console.log('Parent beforeCreate');
            },
            created: function() {
                console.log('Parent created');
            },
            beforeMount: function() {
                console.log('Parent beforeMount');
            },
            mounted: function() {
                console.log('Parent mounted');
            }
        });
    </script>
</body>
</html>
3.2 更新阶段 #
<!DOCTYPE html>
<html lang="en">
<head>
    <meta charset="UTF-8">
    <meta name="viewport" content="width=device-width, initial-scale=1.0">
    <title>Vue Lifecycle Demo</title>
</head>
<body>
    <div id="app">
        <button @click="increment">Increment</button>
        <child-component :count="count"></child-component>
    </div>
    <script src="https://cdn.jsdelivr.net/npm/vue@2"></script>
    <script>
        Vue.component('child-component', {
            props: ['count'],
            template: '<div>Child Component Count: {{ count }}</div>',
            beforeCreate: function() {
                console.log('Child beforeCreate');
            },
            created: function() {
                console.log('Child created');
            },
            beforeMount: function() {
                console.log('Child beforeMount');
            },
            mounted: function() {
                console.log('Child mounted');
            },
            beforeUpdate: function() {
                console.log('Child beforeUpdate');
            },
            updated: function() {
                console.log('Child updated');
            }
        });
        new Vue({
            el: '#app',
            data: {
                count: 0
            },
            template: '<div><button @click="increment">Increment</button><child-component :count="count"></child-component></div>',
            methods: {
                increment() {
                    this.count++;
                }
            },
            beforeCreate: function() {
                console.log('Parent beforeCreate');
            },
            created: function() {
                console.log('Parent created');
            },
            beforeMount: function() {
                console.log('Parent beforeMount');
            },
            mounted: function() {
                console.log('Parent mounted');
            },
            beforeUpdate: function() {
                console.log('Parent beforeUpdate');
            },
            updated: function() {
                console.log('Parent updated');
            }
        });
    </script>
</body>
</html>
3.3 销毁阶段 #
<!DOCTYPE html>
<html lang="en">
<head>
    <meta charset="UTF-8">
    <meta name="viewport" content="width=device-width, initial-scale=1.0">
    <title>Vue Lifecycle Demo</title>
</head>
<body>
    <div id="app">
        <button @click="increment">Increment</button>
        <button @click="destroyComponent">Destroy Component</button>
        <child-component v-if="showChild" :count="count"></child-component>
    </div>
    <script src="https://cdn.jsdelivr.net/npm/vue@2"></script>
    <script>
        Vue.component('child-component', {
            props: ['count'],
            template: '<div>Child Component Count: {{ count }}</div>',
            beforeCreate: function() {
                console.log('Child beforeCreate');
            },
            created: function() {
                console.log('Child created');
            },
            beforeMount: function() {
                console.log('Child beforeMount');
            },
            mounted: function() {
                console.log('Child mounted');
            },
            beforeUpdate: function() {
                console.log('Child beforeUpdate');
            },
            updated: function() {
                console.log('Child updated');
            },
            beforeDestroy: function() {
                console.log('Child beforeDestroy');
            },
            destroyed: function() {
                console.log('Child destroyed');
            }
        });
        new Vue({
            el: '#app',
            data: {
                count: 0,
                showChild: true
            },
            template: '<div><button @click="increment">Increment</button><button @click="destroyComponent">Destroy Component</button><child-component v-if="showChild" :count="count"></child-component></div>',
            methods: {
                increment() {
                    this.count++;
                },
                destroyComponent() {
                    this.showChild = false;
                }
            },
            beforeCreate: function() {
                console.log('Parent beforeCreate');
            },
            created: function() {
                console.log('Parent created');
            },
            beforeMount: function() {
                console.log('Parent beforeMount');
            },
            mounted: function() {
                console.log('Parent mounted');
            },
            beforeUpdate: function() {
                console.log('Parent beforeUpdate');
            },
            updated: function() {
                console.log('Parent updated');
            },
            beforeDestroy: function() {
                console.log('Parent beforeDestroy');
            },
            destroyed: function() {
                console.log('Parent destroyed');
            }
        });
    </script>
</body>
</html>
4.父组件向子组件传值 #
在 Vue.js 中,父组件可以使用 props 向子组件传递数据。这是单向数据流,数据的所有权和修改权仍在父组件中,下面是一个详细的流程:
- 定义子组件,并在子组件中声明 props:首先,我们需要创建一个子组件,并在这个子组件中声明我们想要接收的 prop。这可以通过在子组件中定义一个
props选项来实现。 - 在父组件中绑定数据到子组件的 props:然后,在父组件中,我们可以将数据绑定到子组件的 props 上。这可以通过在子组件的 HTML 标签上使用
v-bind指令(或简写为:)来实现。 - 在父组件的数据中定义要传递的数据:在父组件的数据选项中,我们需要定义要传递给子组件的数据。
这就是父组件向子组件传递数据的基本流程。值得注意的是,这种数据流是单向的,也就是说子组件不能直接修改从父组件接收的 prop 的值。如果子组件需要根据父组件传递的 prop 来修改自己的数据,那么它应该将这个 prop 的值赋给一个本地的数据属性,然后进行修改。
<body>
    <div id="app">
        <counter :count="count"></counter>
    </div>
    <script src="https://cdn.jsdelivr.net/npm/vue@2/dist/vue.js"></script>
    <script>
        var vm = new Vue({
            el: '#app',
            data: {
                count:5
            },
            components: {
                'counter': {
                     //props: ['count'],
                    props: {
                      count:String
                    },
                    template: `
                    <button v-on:click="count++">
                        {{count}}
                    </button>`
                }
            }
        })
    </script>
</body>
请注意,由于 JavaScript 的限制,Vue 不能检测到对象属性的添加或删除,所以尽量在创建实例时,就包含所有必要的字段和初始值。
这就是 Vue.js 中父子组件之间数据通信的基础。对于更复杂的情况,你可能需要使用 Vue 的自定义事件系统,或者更高级的状态管理模式,如 Vuex。
在 Vue.js 中,你可以在组件的 props 选项中进行类型校验。这可以确保你的组件以正确的方式使用,并在开发过程中避免一些常见的错误。Vue.js 支持多种 JavaScript 原始类型的校验,包括字符串、数字、布尔值、数组和对象,甚至可以使用自定义的验证函数。
以下是一些基本的类型校验示例:
<body>
    <div id="app">
        <person :age="age"
                :name="name"
                :isEmployed="isEmployed"
                :skills="skills"
                :rating="rating">
        </person>
    </div>
    <script src="https://cdn.jsdelivr.net/npm/vue@2/dist/vue.js"></script>
    <script>
        var vm = new Vue({
            el: '#app',
            data: {
                age: 25,
                name: "John",
                isEmployed: true,
                skills: ['JavaScript'],
                rating: 'good' // 只能是 'good', 'average', 'poor'
            },
            components: {
                'person': {
                    props: {
                        // 年龄必须是数字
                        age: {
                            type: Number,
                            required: true
                        },
                        // 姓名必须是字符串
                        name: {
                            type: String,
                            required: true
                        },
                        // 是否有工作
                        isEmployed: {
                            type: Boolean,
                            default: false
                        },
                        // 技能数组
                        skills: {
                            type: Array,
                            default: function () {
                                return ['JavaScript', 'Vue']
                            }
                        },
                        // 评分验证
                        rating: {
                            validator: function (value) {
                                return ['good', 'average', 'poor'].indexOf(value) !== -1
                            },
                            required: true
                        }
                    },
                    template: `<div>
                                    <p>Name: {{name}}, Age: {{age}}</p>
                                    <p>Employed: {{isEmployed}}</p>
                                    <p>Skills: {{skills.join(', ')}}</p>
                                    <p>Rating: {{rating}}</p>
                               </div>`
                }
            }
        })
    </script>
</body>
上述代码片段展示了多种 props 校验方式,包括基本类型校验,可选类型,必填字段,字段默认值,以及自定义验证函数。
这种方式能让我们在组件被错误使用时提供更友好的警告。尤其是在开发过程中,这种类型校验可以帮助我们发现和避免错误。
5.子组件向父组件传递数据 #
在 Vue 中,子组件向父组件传递数据通常使用自定义事件的方式。下面是一个基本的步骤:
- 首先,在子组件中我们需要使用
$emit方法触发一个自定义事件,并且可以将需要传递的数据作为该事件的参数。 - 然后,在父组件中,我们需要监听子组件触发的这个自定义事件,并在事件处理函数中接收传递过来的数据。
<body>
    <div id="app">
        <counter :count="count" @increase="parentIncrease"></counter>
    </div>
    <script src="https://cdn.jsdelivr.net/npm/vue@2/dist/vue.js"></script>
    <script>
        var vm = new Vue({
            el: '#app',
            data: {
                count: 5
            },
            methods: {
                parentIncrease: function (num) {
                    this.count += num;
                }
            },
            components: {
                'counter': {
                    props: { count: Number },
                    methods: {
                        childIncrease: function (num) {
                            this.$emit('increase', num);
                        }
                    },
                    template: `<button @click="childIncrease(5)">{{count}}</button>`
                }
            }
        })
    </script>
</body>
总的来说,子组件通过触发一个自定义事件并将数据作为参数来传递数据给父组件,父组件通过监听这个自定义事件并在事件处理函数中接收数据来获取子组件传递过来的数据。
6.兄弟组件的数据传递 #
EventBus,也就是事件总线,是实现Vue组件间通信的一种方式。它本质上是一个空的Vue实例,通过利用Vue自身的$emit和$on方法实现事件和数据的传递。对于实现兄弟组件间的通信,EventBus是一种有效的手段。
以下是使用 EventBus 在 Vue2 中实现兄弟组件通信的详细步骤:
1. 创建一个 EventBus 实例
首先,我们需要创建一个全局可用的 EventBus 实例。它通常会被放置在一个单独的文件中,以便可以在任何地方导入并使用。
2. 在一个组件中发送事件
假设我们有一个名为ComponentA的组件,我们希望在其中发送一个事件,这个事件包含一条消息。我们可以使用 EventBus 的 $emit 方法来发送一个事件,并附带需要传递的数据。
在这个例子中,我们发送了一个名为 'message' 的事件,并传递了一条消息 'Hello from Component A!'。
3. 在另一个组件中监听事件
接下来,我们希望在另一个名为ComponentB的组件中接收这个消息。我们可以在这个组件的 created 钩子中使用 EventBus 的 $on 方法来监听我们之前发送的 'message' 事件。
当ComponentA发送 'message' 事件时,ComponentB 就会接收到这个事件并打印出附带的数据。
注意: 在使用 EventBus 时,需要注意清理事件监听,以防止产生不必要的内存泄露。在组件销毁时(比如在 beforeDestroy 或 destroyed 钩子中)使用 EventBus 的 $off 方法可以取消事件监听。
<body>
  <div id="app">
    <component-a></component-a>
    <component-b></component-b>
  </div>
  <script src="https://cdn.jsdelivr.net/npm/vue@2/dist/vue.js"></script>
  <script>
    const EventBus = new Vue();
    var vm = new Vue({
      el: "#app",
      components: {
        "component-a": {
          created() {
            EventBus.$on("message", this.handleMessage);
          },
          beforeDestroy() {
            EventBus.$off("message", this.handleMessage);
          },
          methods: {
            sendMessage() {
              EventBus.$emit("message", "Hello from Component a!");
            },
            handleMessage(data) {
              console.log(data);
            },
          },
          template: `<button @click="sendMessage()">a sendMessage</button>`,
        },
        "component-b": {
          created() {
            EventBus.$on("message", this.handleMessage);
          },
          beforeDestroy() {
            EventBus.$off("message", this.handleMessage);
          },
          methods: {
            sendMessage() {
              EventBus.$emit("message", "Hello from Component b!");
            },
            handleMessage(data) {
              console.log(data);
            },
          },
          template: `<button @click="sendMessage()">b sendMessage</button>`,
        },
      },
    });
  </script>
</body>
这就是如何在 Vue2 中使用 EventBus 实现兄弟组件间的通信。这种方式的一个优点是它可以实现任何两个组件间的通信,不仅仅是兄弟组件,而且这两个组件不需要有任何直接的关系。
7.Vue实例传递数据 #
在 Vue2 中,$root、$parent、$children 和 $refs 是一些常用的实例属性,它们可以帮助你在组件树中导航和访问其他组件。以下是它们的详细解释:
$root: 这个属性提供了对根 Vue 实例的引用。如果你在组件内部需要访问在根实例上定义的属性或方法,你可以使用$root。但是,通常我们应该避免在子组件中直接访问根实例,因为这破坏了组件的封装性。$parent: 这个属性提供了对父组件的引用。你可以使用$parent访问父组件的数据和方法。然而,过度使用$parent可能会使得组件之间的耦合度过高,不利于代码的维护和复用。$children: 这个属性包含了当前组件的直接子组件。这是一个数组,你可以通过它访问子组件的数据和方法。但是,这个数组并不保证有任何特定的顺序,所以依赖$children来获取特定的子组件可能是不可靠的。$refs: 如果你需要在 JavaScript 中直接访问一个子组件,你可以在那个子组件上使用ref特性来设置一个标识符,然后在父组件中通过$refs访问到它。注意,$refs只会在组件渲染完成后被填充,并且它是非响应式的,它不应该被用在模板中。
总的来说,虽然这些属性提供了在组件树中导航的能力,但是过度使用它们可能会导致组件之间的耦合度过高,不利于代码的维护和复用。在大多数情况下,我们应该优先使用 props 和 events 来进行父子组件之间的通信。
<body>
  <div id="app"></div>
  <script src="https://cdn.jsdelivr.net/npm/vue@2/dist/vue.js"></script>
  <script>
    var vm = new Vue({
      el: "#app",
      data: () => ({ msg: "parent" }),
      template: `<div>parent<child></child></div>`,
      components: {
        child: {
          data: () => ({ msg: "child" }),
          template:
            '<div @click="print">child<grandchild ref="grandchild"></grandchild></div>',
          methods: {
            print() {
              console.log(this.$parent.msg);
              console.log(this.$root.msg);
              console.log(this.$children[0].msg);
              console.log(this.$refs.grandchild.msg);
            },
          },
          components: {
            grandchild: {
              data: () => ({ msg: "grandchild" }),
              template: "<div >grandchild</div>",
            },
          },
        },
      },
    });
  </script>
</body>
8.provide #
在Vue.js中,provide和inject构成了一个依赖注入的API,用于在父组件和后代组件间进行数据传递,无论后代组件层级有多深。它主要用于开发高阶插件/组件库。以下是关于provide和inject的详细解释:
provide: 是在父组件中定义的一个选项。这个选项可以是一个对象或者返回对象的函数,对象的属性值将会被子组件注入。这里的值可以是数据、方法等。inject: 是在子组件或孙子组件等中定义的一个选项,它是一个数组或者对象,用来声明需要注入的属性。 然后在子组件中就可以访问到这个属性了:
<body>
<div id="app"></div>
<script src="https://cdn.jsdelivr.net/npm/vue@2/dist/vue.js"></script>
<script></script>
</body>
值得注意的是,provide和inject绑定并不是可响应的。也就是说,如果你更改了provide提供的对象的属性,那么子组件并不能感知到这个变化。但是,如果提供的值是一个可观察的(observable)数据源,如 Vue 实例或响应式对象,那么其变化能在子组件中被感知和响应。
另外,虽然provide/inject在某些情况下可以简化组件间的数据传递,但它并不适合用在应用级别的状态管理。在大型应用中,推荐使用Vuex来进行状态管理。
9.slot #
在 Vue.js 中,slot 是一种非常重要的内容分发 API,它允许你在组件中嵌入任意的内容。这种方式非常灵活,允许你创建可复用的组件,这些组件的一部分内容可以由使用这些组件的地方来确定。
9.1 默认插槽 #
- 默认插槽 (Default Slot):
如果一个组件的模板中包含一个没有
name属性的<slot>标签,那么这就是一个默认插槽。 在使用该组件的地方,如果你在组件标签内部添加一些内容,那么这些内容会被插入到组件模板的默认插槽位置。
  <body>
    <div id="app"></div>
    <script src="https://cdn.jsdelivr.net/npm/vue@2/dist/vue.js"></script>
    <script>
      var vm = new Vue({
        el: "#app",
        template: `<div><default-slot>default</default-slot></div>`,
        components: {
          "default-slot": {
            template: "<div><slot></slot></div>",
          },
        },
      });
    </script>
  </body>
9.2 具名插槽 #
- 具名插槽 (Named Slot): 如果你的组件模板中需要有多个插槽,那么你可以使用具名插槽。具名插槽是通过给
<slot>标签添加name属性来定义的。
<body>
<div id="app"></div>
<script src="https://cdn.jsdelivr.net/npm/vue@2/dist/vue.js"></script>
<script></script>
</body>
在这个例子中,<h1>header</h1> 会被插入到 named-slot 的 "header" 插槽,<h1>footer</h1> 会被插入到 "footer" 插槽,其余内容会被插入到默认插槽。
9.3 作用域插槽 #
作用域插槽是 Vue.js 的一个强大特性,允许父组件接入子组件中的一部分自定义区域,并在这些区域中可以访问子组件传递出来的数据。在 Vue 中,你可以通过在 <slot> 标签上使用 v-bind 来定义要传递到父组件的数据。
- 定义作用域插槽: 子组件可以在
<slot>标签上使用v-bind来定义要传递到父组件的数据 - 使用作用域插槽: 父组件可以在模板中使用特殊的
v-slot指令来访问子组件传递过来的数据。
<body>
<div id="app"></div>
<script src="https://cdn.jsdelivr.net/npm/vue@2/dist/vue.js"></script>
<script></script>
</body>
9.4 总结 #
| 插槽类型 | 子组件老写法 | 子组件新写法 | 父组件老写法 | 父组件新写法 |
|---|---|---|---|---|
| 默认插槽 | <slot></slot> |
<slot></slot> |
- | - |
| 具名插槽 | <slot name="header"></slot> |
<slot name="header"></slot> |
<template slot="header"></template> |
<template v-slot:header></template> |
| 作用域插槽 | <slot name="header" :title="{title}"></slot> |
<slot name="header" :title="{title}"></slot> |
<template slot="header" slot-scope="slotProps"><p>{{slotProps.title}}</p></template> |
<template v-slot:header="slotProps"><p>{{slotProps.title}}</p></template> |
9.5 默认插槽 #
Vue 的 slot 是用于组件模板之间进行内容分发的一种机制,它允许你在子组件模板中开放出一些位置,让使用者可以自定义这部分的内容。
基本的 slot 使用:
// 在子组件中定义 slot
<template>
  <div>
    <h2>I'm a child component</h2>
    <slot></slot>
  </div>
</template>

// 在父组件中使用
<template>
  <div>
    <ChildComponent>
      <p>This will be put into the child component's slot</p>
    </ChildComponent>
  </div>
</template>
以上面的代码为例,<p>This will be put into the child component's slot</p> 这段代码将会出现在子组件模板中 <slot></slot> 的位置。
9.6 命名插槽 #
此外,Vue 的 slot 还支持“命名插槽”。这意味着在子组件中,你可以定义多个插槽,并且给每个插槽指定一个名字,然后在使用子组件的地方,你可以向指定的插槽填充内容。例如:
// 在子组件中定义命名的 slot
<template>
  <div>
    <h2>I'm a child component</h2>
    <slot name="one"></slot>
    <slot name="two"></slot>
  </div>
</template>

// 在父组件中使用
<template>
  <div>
    <ChildComponent>
      <p slot="one">This will be put into the child component's 'one' slot</p>
      <p slot="two">This will be put into the child component's 'two' slot</p>
    </ChildComponent>
  </div>
</template>
在这个例子中,第一个 <p> 标签会被插入到子组件的 one 插槽中,第二个 <p> 标签会被插入到 two 插槽中。
9.7 作用域插槽 #
在Vue.js中,作用域插槽是一种非常强大的功能,它允许我们将自定义的模板结构传递给子组件,同时这些模板可以访问子组件中的数据。作用域插槽的核心思想是,子组件“借用”一部分父组件的模板,并可以将自己的状态(数据)注入其中。
Vue 2中的作用域插槽在使用时分为两个部分,分别是子组件端和父组件端。
子组件端
在子组件中,作用域插槽通过slot元素定义,并使用特殊的v-bind绑定 (通常简写为:),将子组件的数据提供给插槽。例如:
<template>
  <div>
    <slot name="item" :item="item"></slot>
  </div>
</template>

<script>
export default {
  data() {
    return {
      item: '我是子组件的数据'
    }
  }
}
</script>
父组件端
在父组件中,使用template标签和slot属性来使用具名插槽,并使用特殊的scope属性来接收插槽传出的数据。例如:
<template>
  <ChildComponent>
    <template slot="item" scope="props">
      <p>{{ props.item }}</p>
    </template>
  </ChildComponent>
</template>

<script>
import ChildComponent from './ChildComponent.vue';

export default {
  components: {
    ChildComponent
  }
}
</script>
在上述代码中,ChildComponent是子组件的名字。在父组件的模板中,我们使用了名为item的作用域插槽,并通过scope="props"接收了子组件传出的数据(在这个例子中是item)。然后我们在模板中可以使用这些数据。
10.component #
在 Vue.js 中,<component> 是一个保留的标签,用于动态组件。你可以使用 is 特性来决定要渲染哪个组件。
这是 <component> 标签和 is 属性的主要用法:
<component :is="componentName"></component>
其中,componentName 是一个字符串,用于指定要渲染的组件。你也可以使用对象语法,传入一个组件的选项对象。
<body>
    <div id="app"></div>
    <script src="https://cdn.jsdelivr.net/npm/vue@2/dist/vue.js"></script>
    <script>
      var vm = new Vue({
        el: "#app",
        data: { currentComponent: "component-a" },
        template: `<component :is="currentComponent"></component>`,
        components: {
          "component-a": {
            template: `<div>A</div>`,
          },
          "component-b": {
            template: `<div>B</div>`,
          },
        },
      });
    </script>
</body>
11. Vue.extend #
Vue.extend 是一个类级别的方法,用于生成一个 Vue 的子类,允许创建可复用的组件构造器。你可以传入一个包含 Vue 组件选项的对象作为参数。
下面是一个简单的例子:
<body>
    <div id="app1"></div>
    <div id="app2"></div>
    <script src="https://unpkg.com/vue@2/dist/vue.js"></script>
    <script>
        Vue.extend = function(config) {
            return class SubVue extends Vue{
                constructor(options){
                    super({...config,...options});
                }
            }
        };
        var ExtendComponent = Vue.extend({
            template: '<div>hello</div>'
        })
        new ExtendComponent().$mount('#app1')
        new ExtendComponent().$mount('#app2')
    </script>
</body>
在这个例子中,我们使用 Vue.extend 创建了一个新的 Vue 子类,然后实例化并挂载到 DOM 中。我们将一个包含 template 选项的对象传递给 Vue.extend,这个选项和你在新建一个 Vue 实例时使用的选项是一样的,如 data、methods、computed、watch、lifecycle hooks 等。
生成的组件构造器可以作为自定义元素或者在 route 配置中使用。因此,Vue.extend 主要用于 Vue 的全局扩展,生成的构造器通常会与 new Vue() 结合使用生成新的 Vue 实例。
总结一下,Vue.extend 的主要用途是创建可复用的组件构造器,你只需要传入一个包含组件选项的对象即可,非常方便。
12. Vue.use #
Vue.use() 方法用于安装 Vue.js 插件。如果插件是一个对象,它必须提供一个 install 方法。如果它本身是一个函数,它将作为 install 方法。install 方法将被作为 Vue 的参数调用。
以下是Vue.use的基本用法:
// 调用 `MyPlugin.install(Vue)`
Vue.use(MyPlugin)
你也可以传入额外的选项:
// 传入额外的选项
Vue.use(MyPlugin, { someOption: true })
Vue.use() 内部会保证插件只安装一次。如果一个插件已经安装了,再次使用 Vue.use() 安装该插件将会被忽略。
下面是一个简单插件的实例,该插件为 Vue 实例添加一个方法:
const MyPlugin = {
  install(Vue, options) {
    Vue.prototype.$myMethod = function() {
      console.log('This is my method');
    }
  }
};

Vue.use(MyPlugin);

new Vue({
  created() {
    this.$myMethod();  // 输出 "This is my method"
  }
});
实现原理
Vue.use 的主要工作是调用插件的 install 方法,并将 Vue 构造函数和用户传递的选项作为参数传入。
一个简化版的 Vue.use 实现如下:
Vue._installedPlugins = [];  // 假设 Vue 维护了一个内部数组来存放已经安装的插件

Vue.use = function(plugin, ...options) {
  // 检查插件是否已经被安装
  if (Vue._installedPlugins.includes(plugin)) {
    return;
  }

  // 调用 install 方法安装插件
  if (typeof plugin.install === 'function') {
    plugin.install(Vue, ...options);
  } else if (typeof plugin === 'function') {
    plugin(Vue, ...options);
  }

  // 将插件添加到已安装插件列表
  Vue._installedPlugins.push(plugin);
}
这个简单的实现没有涉及所有的细节和优化,但捕捉到了 Vue.use 方法的主要逻辑。
通过这种方式,Vue 插件通常可以添加全局方法或属性、添加全局资源(指令、过滤器等)、通过全局混入添加一些组件选项等。这也是很多 Vue.js 库和框架(例如 Vue Router、Vuex 等)成为“插件”的方式。
<body>
  <script src="https://unpkg.com/vue@2/dist/vue.js"></script>
  <script>
      Vue._installedPlugins = [];
      Vue.use = function (plugin, ...options) {
          if (Vue._installedPlugins.includes(plugin)) {
              return;
          }
          if (typeof plugin.install === 'function') {
              plugin.install(Vue, ...options);
          } else if (typeof plugin === 'function') {
              plugin(Vue, ...options);
          }
          Vue._installedPlugins.push(plugin);
      }
      const MyPlugin = {
          install(Vue, options) {
              Vue.prototype.$myMethod = function () {
                  console.log('This is my method');
              }
          }
      };
      Vue.use(MyPlugin);
      new Vue({
          created() {
              this.$myMethod();
          }
      });
  </script>
</body>
13. Vue.mixin #
Vue.mixin 是 Vue 中用于全局注册一个混入的方法,作用是将传入对象的所有属性合并到 Vue 的根构造器中。这样,每个 Vue 实例(包括根实例和所有组件实例)在创建时,都会合并这个混入对象的选项。
混入(mixin)本质上是一个包含组件选项(如生命周期钩子、计算属性、方法等)的对象。当组件使用混入对象时,所有混入对象的选项都将被“混合”到组件的自己的选项中。
基本用法
这里有一个简单的例子:
// 定义一个混入对象
const myMixin = {
  created() {
    console.log('混入对象的钩子被调用')
  },
  methods: {
    hello() {
      console.log('hello from mixin!')
    }
  }
}

// 全局注册混入对象
Vue.mixin(myMixin)

// 创建一个 Vue 实例
new Vue({
  created() {
    console.log('组件自身的钩子被调用')
  },
  mounted() {
    this.hello()
  }
})

// 输出:
// "混入对象的钩子被调用"
// "组件自身的钩子被调用"
// "hello from mixin!"
在这个例子中,我们定义了一个包含 created 生命周期钩子和 hello 方法的混入对象,并使用 Vue.mixin 全局注册了这个混入。因此,任何新创建的 Vue 实例都会执行这个 created 钩子并包含 hello 方法。
注意事项
全局混入应当谨慎使用:由于
Vue.mixin会影响每个创建的 Vue 实例,使用不当可能导致问题。选项合并:如果组件和混入对象含有同名选项,则这些选项将以适当的方式(数组、对象、函数等)合并。
生命周期钩子合并:当组件和混入对象含有同名的生命周期钩子时,都将被调用,且混入对象的钩子先调用。
方法和计算属性:如果组件和混入对象有同名的方法或计算属性,组件的选项将覆盖混入对象的。
使用全局混入通常是全局添加某种功能或行为的快捷方式,但应该小心使用,以避免不必要的复杂性和潜在的命名冲突。如果可能,更推荐在具体的组件内使用混入,或者通过插件机制提供全局功能。
<!DOCTYPE html>
<html lang="en">

<head>
    <meta charset="UTF-8">
    <meta name="viewport" content="width=device-width, initial-scale=1.0">
    <title>Document</title>
</head>
<body>
    <div id="app">
        {{1+1}}
        {{mixinData}}
        {{localData}}
    </div>
    <script src="vue.js"></script>
    <script>
        Vue.mixin = function (mixinOptions) {
            const originalInit = this.prototype._init;
            this.prototype._init = function (options) {
                options = mergeOptions(this.constructor.options, mixinOptions, options);
                originalInit.call(this, options);
            };
            function mergeOptions(parent, mixin, child) {
                const options = Object.assign({}, parent,mixin, child);
                options.data = Object.assign({}, parent.data, mixin.data, child.data);
                options.methods = Object.assign({}, parent.methods, mixin.methods, child.methods);
                options.computed = Object.assign({}, parent.computed, mixin.computed, child.computed);
                options.watch = Object.assign({}, parent.watch, mixin.watch, child.watch);
                ['created', 'mounted'].forEach(hook => {
                    options[hook] = [].concat(parent[hook] || [], mixin[hook] || [], child[hook] || []);
                });
                return options;
            }
        }
        Vue.mixin({
            data: {
                mixinData: '我是来自混入的数据'
            },
            created() {
                console.log('全局混入的 created 钩子');
            },
            mounted(){
                console.log('全局混入的 mounted 钩子');
            },
            methods: {
                mixinMethod() {
                    console.log('这是一个全局混入的方法');
                }
            },
            computed: {
                mixinComputed() {
                    return this.mixinData + '(经过计算)';
                }
            },
            watch: {
                mixinData(newVal, oldVal) {
                    console.log(`mixinData 从 ${oldVal} 变为 ${newVal}`);
                }
            }
        });
        var vm = new Vue({
            el: '#app',
            data: {
                localData: '我是本地数据'
            },
            created() {
                console.log('组件自身的 created 钩子');
            },
            mounted(){
                console.log('组件自身的 mounted 钩子');
            },
            methods: {
                localMethod() {
                    console.log('这是一个组件自身的方法');
                }
            },
            computed: {
                localComputed() {
                    return this.localData + '(经过计算)';
                }
            },
            watch: {
                localData(newVal, oldVal) {
                    console.log(`localData 从 ${oldVal} 变为 ${newVal}`);
                }
            }
        });
        vm.localData='localData2';
        vm.mixinData='mixinData2';
    </script>
</body>

</html>
14. functional #
在 Vue 中,functional 是一个用于创建功能性组件(functional components)的选项。功能性组件与普通 Vue 组件(stateful components)的主要区别在于它们没有实例,也就是说,它们没有 this 上下文,没有生命周期钩子(lifecycle hooks),以及没有内部状态(internal state)。因此,功能性组件一般更轻量,渲染也更快。
context
在功能性组件的 render 函数中,第二个参数是一个 context 对象,它包含以下属性:
14.1 props #
props: 传递给组件的 props。
<!DOCTYPE html>
<html lang="en">
<head>
    <meta charset="UTF-8">
    <meta name="viewport" content="width=device-width, initial-scale=1.0">
    <title>Functional Component Example</title>
    <script src="https://cdn.jsdelivr.net/npm/vue@2.6.14/dist/vue.js"></script>
</head>
<body>
    <div id="app">
        <functional-component :user-name="'John'"></functional-component>
    </div>
    <script>
        Vue.component('functional-component', {
            functional: true,
            props: ['userName'],
            render: function (createElement, context) {
                // 获取props中的userName
                var userName = context.props.userName;
                // 创建一个包含用户名的VNode
                return createElement('p', 'Hello, ' + userName);
            }
        });
        var vm = new Vue({
            el: '#app'
        });
    </script>
</body>
</html>
14.2 children #
children: VNode 子节点数组。
<!DOCTYPE html>
<html lang="en">
<head>
    <meta charset="UTF-8">
    <meta name="viewport" content="width=device-width, initial-scale=1.0">
    <title>Functional Component Example</title>
</head>
<body>
    <div id="app">
        <functional-wrapper>
            <p>Hello</p>
            <p>World</p>
        </functional-wrapper>
    </div>
    <script src="https://cdn.jsdelivr.net/npm/vue@2.6.14/dist/vue.js"></script>
    <script>
        Vue.component('functional-wrapper', {
            functional: true,
            render: function (createElement, context) {
                return createElement('div', context.data, context.children);
            }
        });

        var vm = new Vue({
            el: '#app'
        });
    </script>
</body>
</html>
14.3 slots #
slots: 一个返回组件插槽内容的函数。
<!DOCTYPE html>
<html lang="en">

<head>
    <meta charset="UTF-8">
    <meta name="viewport" content="width=device-width, initial-scale=1.0">
    <title>Functional Component with Named Slots</title>
</head>

<body>
    <div id="app">
        <functional-slot-wrapper>
            <template v-slot:header>
                <h1>Header Slot</h1>
            </template>
            <template v-slot:default>
                <p>Default Slot</p>
            </template>
            <template v-slot:footer>
                <h2>Footer Slot</h2>
            </template>
        </functional-slot-wrapper>
    </div>
    <script src="https://cdn.jsdelivr.net/npm/vue@2.6.14/dist/vue.js"></script>
    <script>
        Vue.component('FunctionalSlotWrapper', {
            functional: true,
            render: function (createElement, context) {
                const slots = context.slots();
                return createElement('div', context.data, [
                    slots.header ? slots.header : '',
                    slots.default ? slots.default : '',
                    slots.footer ? slots.footer : ''
                ]);
            }
        });

        var vm = new Vue({
            el: '#app'
        });
    </script>
</body>
</html>
14.4 data #
data: 传递给组件的数据对象,包括普通attributes、class、style等。
<!DOCTYPE html>
<html lang="en">
<head>
    <meta charset="UTF-8">
    <meta name="viewport" content="width=device-width, initial-scale=1.0">
    <title>Functional Component Example</title>
</head>
<body>
    <div id="app">
        <functional-button :label="'Click Me'" class="my-button" :style="{ color: 'red' }"></functional-button>
    </div>
    <script src="https://cdn.jsdelivr.net/npm/vue@2.6.14/dist/vue.js"></script>
    <script>
        // 定义功能性组件
        const FunctionalButton = {
            functional: true,
            props: ['label'],
            render: function (createElement, context) {
                // context.data 对象将包含 'class' 和 'style'
                return createElement('button', context.data, context.props.label);
            }
        };
        // 创建 Vue 实例
        var vm = new Vue({
            el: '#app',
            components: {
                'functional-button': FunctionalButton
            }
        });
    </script>
    <style>
        .my-button {
            font-size: 20px;
            padding: 10px;
        }
    </style>
</body>
</html>
14.5 parent #
parent: 父组件实例。
<!DOCTYPE html>
<html lang="en">

<head>
    <meta charset="UTF-8">
    <meta name="viewport" content="width=device-width, initial-scale=1.0">
    <title>Document</title>
</head>
<body>
    <div id="app">
        <functional-child></functional-child>
    </div>
    <script src="https://cdn.jsdelivr.net/npm/vue@2.6.14/dist/vue.js"></script>
    <script>
        // 定义一个功能性组件
        const FunctionalChild = {
            functional: true,
            render: function (createElement, context) {
                // 通过 context.parent 访问父组件实例
                const parentMessage = context.parent.parentMessage;
                return createElement('div', `Message from parent: ${parentMessage}`);
            }
        };
        var vm = new Vue({
            el: '#app',
            data: {
                parentMessage: 'Hello from parent'
            },
            components: {
                'functional-child': FunctionalChild
            }
        });
    </script>
</body>
</html>
14.6 listeners #
listeners: (2.3.0+) 包含了组件上的 (原生的) 监听器。这是 data.on 的一个别名<!DOCTYPE html> <html lang="en"> <head> <meta charset="UTF-8"> <title>Functional Component Example</title> <script src="https://cdn.jsdelivr.net/npm/vue@2.6.14/dist/vue.js"></script> </head> <body> <div id="app"> <functional-button @click="handleClick"></functional-button> </div> <script> const FunctionalButton = { functional: true, render(h, context) { return h('button', { // 合并传递过来的 data 对象 ...context.data, // 使用 context.listeners 设置事件监听器 on: context.listeners }, 'Click Me'); } }; const vm = new Vue({ el: '#app', components: { 'functional-button': FunctionalButton }, methods: { handleClick() { alert('Button clicked!'); } } }); </script> </body> </html>
14.7 injections #
injections: (2.3.0+) 如果使用了 inject 选项,则该对象包含了应当被注入的属性。
<!DOCTYPE html>
<html lang="en">
<head>
    <meta charset="UTF-8">
    <meta name="viewport" content="width=device-width, initial-scale=1.0">
    <title>Functional Component with Injections</title>
</head>
<body>
    <div id="app">
        <!-- 使用功能性组件 -->
        <functional-child></functional-child>
    </div>
    <script src="https://cdn.jsdelivr.net/npm/vue@2.6.14/dist/vue.js"></script>
    <script>
        // 定义一个功能性组件
        var FunctionalChild = {
            functional: true,
            inject: ['theme'], // 注入 theme
            render: function (createElement, context) {
                // 从 context.injections 中获取 theme
                var theme = context.injections.theme;
                return createElement('div', {
                    style: {
                        color: theme === 'dark' ? 'white' : 'black',
                        background: theme === 'dark' ? 'black' : 'white',
                    }
                }, `This is a ${theme} theme component`);
            }
        };
        // 创建 Vue 实例
        var vm = new Vue({
            el: '#app',
            provide: {
                theme: 'dark' // 提供 theme 给所有子孙组件
            },
            components: {
                'functional-child': FunctionalChild
            }
        });
    </script>
</body>
</html>